![]()
Bookmark this page in your phone so you always have it as a reference to answer questions.
Staff Instructions & Video Training Guides
Can't watch videos? Click on youtube links below each video or CLICK HERE for quicktime plugin
![]()
SELECT YOUR JOB CATEGORY BELOW AND CLICK ON LINK
GAME ATTENDANT JOB DESCRIPTION
PHOTO BOOTH ATTENDANT JOB DESCRIPTION
DELIVERY STAFF JOB DESCRIPTION
GAME INSTRUCTION VIDEOS
PHOTO BOOTH INSTRUCTION VIDEOS
CAMERA TERMINOLOGY AND RECOMMENDED SETTINGS
----------------------------------------------------------------------------------------------------------------------
GAME ATTENDANTS
As a game attendant your arrive to the party 30-60 minutes before the start time. You must text a photo to Eric 954-612-7431 that shows you are at the venue on time. We give you extra time in case the party starts early or one of the games is not working correctly so you can tell Eric and he can help you troubleshoot the problem.
When you arrive at the party 1) turn on all the games, 2) test each game to make sure it is working, 3) clean off each game with a damp rag. (grab one from kitchen)
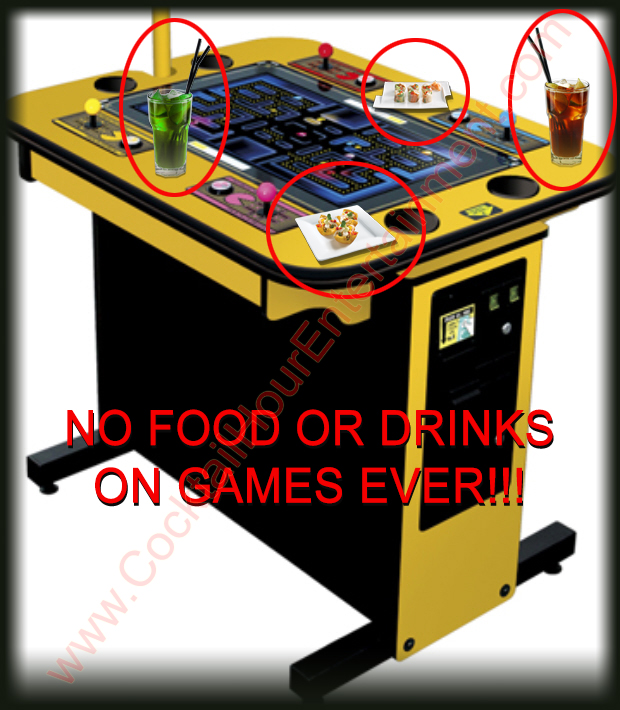
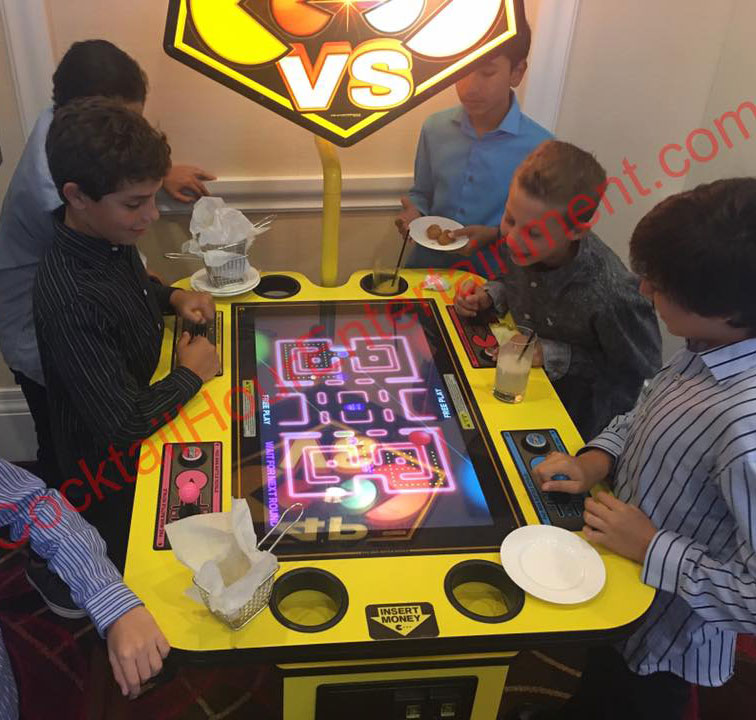
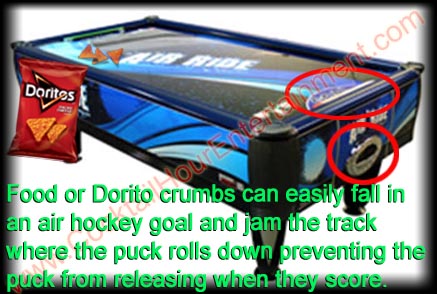
During the party make sure guests are not damaging our equipment, being rough with the games, or putting food or drinks on the games. (Especially drinks!) You are being paid to make the games look clean and to protect our equipment from abuse. If you see food or drinks on games immediately remove them so our games don't look sloppy.
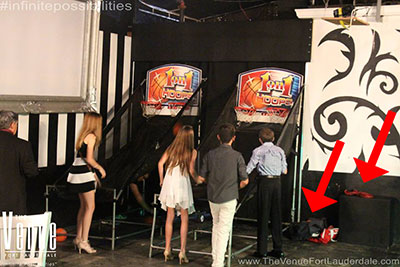
Do not leave empty plates or cups on the games. In the pic below you should remove the plates or drink off our game tables. Allowing this means you are not doing your job!

Do not allow guests to sit or stand on the equipment
The photo above was taken by another entertainment company who worked the same event. They called me and said the attendant was nowhere to be found and 8-10 kids were all sitting on the table and she told them to get off, but the attendant should have been there to tell them. That attendant no longer works for us. Sometimes the hardest part of the job is just standing around, but never forget your #1 job is to protect our equipment.
CALL TIMES: You are scheduled to meet at a party at a specific time. Your call time is the time you should be in the party room. Once you are in the party room you will have time to check all the games over to make sure they are clean and ready before the guests arrive. We always schedule you with enough time to clean and check the games over and still be ready 30 min before the party starts, this does not mean you have extra time to show up later than your scheduled time! Sometimes events start 15-30 minutes early so this is another reason to be on time. If you know you're going to be more than 10 minutes late you must call Eric. Continuing to show up late and not being responsible will result in termination.
More than 1/2 of our jobs are booked thru party planners. These party planners hire us to represent their company and they trust us to make them look good. Even though an event may start at 7pm, the party planners will stress out if the event starts in 20 minutes and you haven't arrived yet.
The party planners love that we are ready 30 mins early and it is one of the main reasons they hire us.
ATTIRE: Wear all black unless otherwise instructed (black pants, plain black collared shirt (polo shirt is ok), and black shoes, black sneakers are ok as long as they are all black. Remember we work at events where guests are wearing tuxedos, dresses, and suits so you must dress professionally.
CHECK ALL GAMES: When you first arrive you must check all games and start each game to make sure all games work. If a game doesn't work or something is missing (ex. no ping pong balls) immediately call Eric 954-612-7431, don't wait 20 minutes!
If a game stops working during a party try to fix it, but also immediately text Eric 954-612-7431 so he is aware the game needs to be checked.
Don't wait until the end of the night to text Eric or you'll forget! Never allow anyone to unplug or move our equipment except our own staff. This means the decorator, the caterer, the waiters, the parents, etc...are not allowed to move our equipment b/c they can damage our games. No one is allowed to touch our equipment unless Eric says it is ok. Speak up and tell them you are in charge of the equipment, not them. If in doubt, call Eric.
PRESENTATION: Always make sure the games are clean and look good for the guests. Earlier in the day our delivery staff set up the games and test them, but sometimes they forget to put something away. If you see game covers, duffel bags, extension cords, a roll of duct tape, tools, or anything the delivery staff may have forgotten just put it away somewhere safe so guests cannot see them, but you can put it back out for them when you leave. Ex. photo below shows 2 duffel bags for the basketballs and an extension cord left out during the party which looks sloppy. You must hide them until the games are closed and then you can bring the bags out to put the games away. Leave the bags out with the games when you finish to remind the delivery staff to take them.
TURNING OFF A GAME: ALWAYS turn the power switch off and then wait 5 seconds BEFORE removing the power cord! If a game has a computer then wait until the computer is completely shut down before unplugging it. Yanking the plug while the game is on will damage the games computer. Do not allow anyone to do this!
Most of our equipment is keyed alike meaning the same key (631 key )will open every machine. The delivery crew will leave one of these keys taped under or behind one of the games that uses this key. This key is used to unlock a game to get inside the machine to adjust the volume, get access to keyboards, remote controls, game controllers, or anything else locked inside the machine. This is also a great way to lock things up when you leave so guests (kids!) don't try to play the games after you leave. Most arcade machines are turned on by plugging a power cord in the back and then turning the power switch on. This power cord gets locked inside the machine so guests cannot use the machine before you arrive or after you leave. There are some games with a power cord that cannot be removed, carefully wrap those cords up so no one trips over the cord. When the party is over turn the power switch off on each machine and wait 5 seconds and then remove the power cord from the back of the machine and lock it back inside the coin box. ALWAYS turn the power switch off BEFORE removing the power cord!
EXTENSION CORDS
All games that require electricity have extension cords. Most arcade games have their own extension cords either locked in the coinbox or locked in the back of the game for safe storing. Use a 631 key and open the game to get the extension cord.
DUCT TAPE
All electric cords must be taped
down so guests cannot trip over the cord. Please tape cords down neatly.
Any part of an extension cord that guests can walk over is considered a tripping hazzard and must be taped down. The following photo shows a cord that was not properly taped down because part of the cord closest to the game is not taped down which creates a tripping hazard.

This is a 6 player air hockey game, but delivery only put 5 mallets out, not 6!
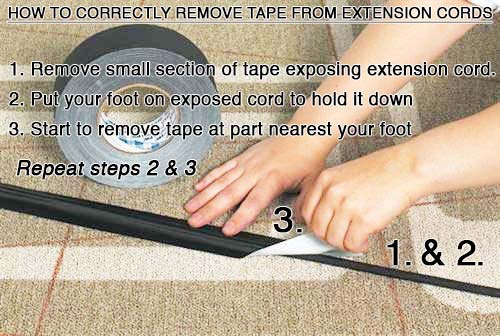
WHEN YOU ARE FINISHED: The extension cords that were taped down must carefully have the tape removed from the cord in sections as you remove it otherwise the tape will get stuck around the extension cords and become difficult to remove. This only happens if you mindlessly pull the whole thing up in one motion. Follow the illustration below.
IMPORTANT: When you unplug games always remove the extension cord for each game and lock the cord in the same games coin box located in the coin door. This secures the cord and prevents guests from accessing it.
Make sure all games are clean before you leave. Get a wet rag and clean games off and remove any crumbs, or sticky surfaces from spilled soda or food. We don't expect perfection, but if we check the equipment for the next week and the equipment is filthy and it is obvious the games were not cleaned you will be docked pay for not doing your job. If a game is damaged or unable to be cleaned you must immediately text Eric so he can fix it before the next weekend. Remember, you are being paid to watch the equipment and report any problems or damage.
EATING/ DRINKING/ SMOKINGThere is absolutely No Smoking, Eating, or Drinking allowed in front of guests. However, with the consent of the client or company that hired us, we may be allowed to eat or drink, but never eat or drink in front of guests. Remember we are working. This means you leave the room when you grab a soda or something to eat. There is also a correct time to eat. For example, we are usually hired to watch games for 1- 4 hours so if we are watching games for only 1 hour we would wait to eat after the hour ends before they put the food away. We never eat before the guests, only after. If you are watching games for 4 hours then you would wait till there was a slow time and guests were not using the games such as during a video presentation or speeches. Alcohol consumption is strictly prohibited at all events. You are never to go to the bar and ask for alcohol, even if a guest or the boss who hires us offers it. It is unprofessional and will result in immediate termination! If asked, you must say, NO. If you start drinking and others observe this we can lose jobs!
------------------------------------------------------------------------------------------------------------------------
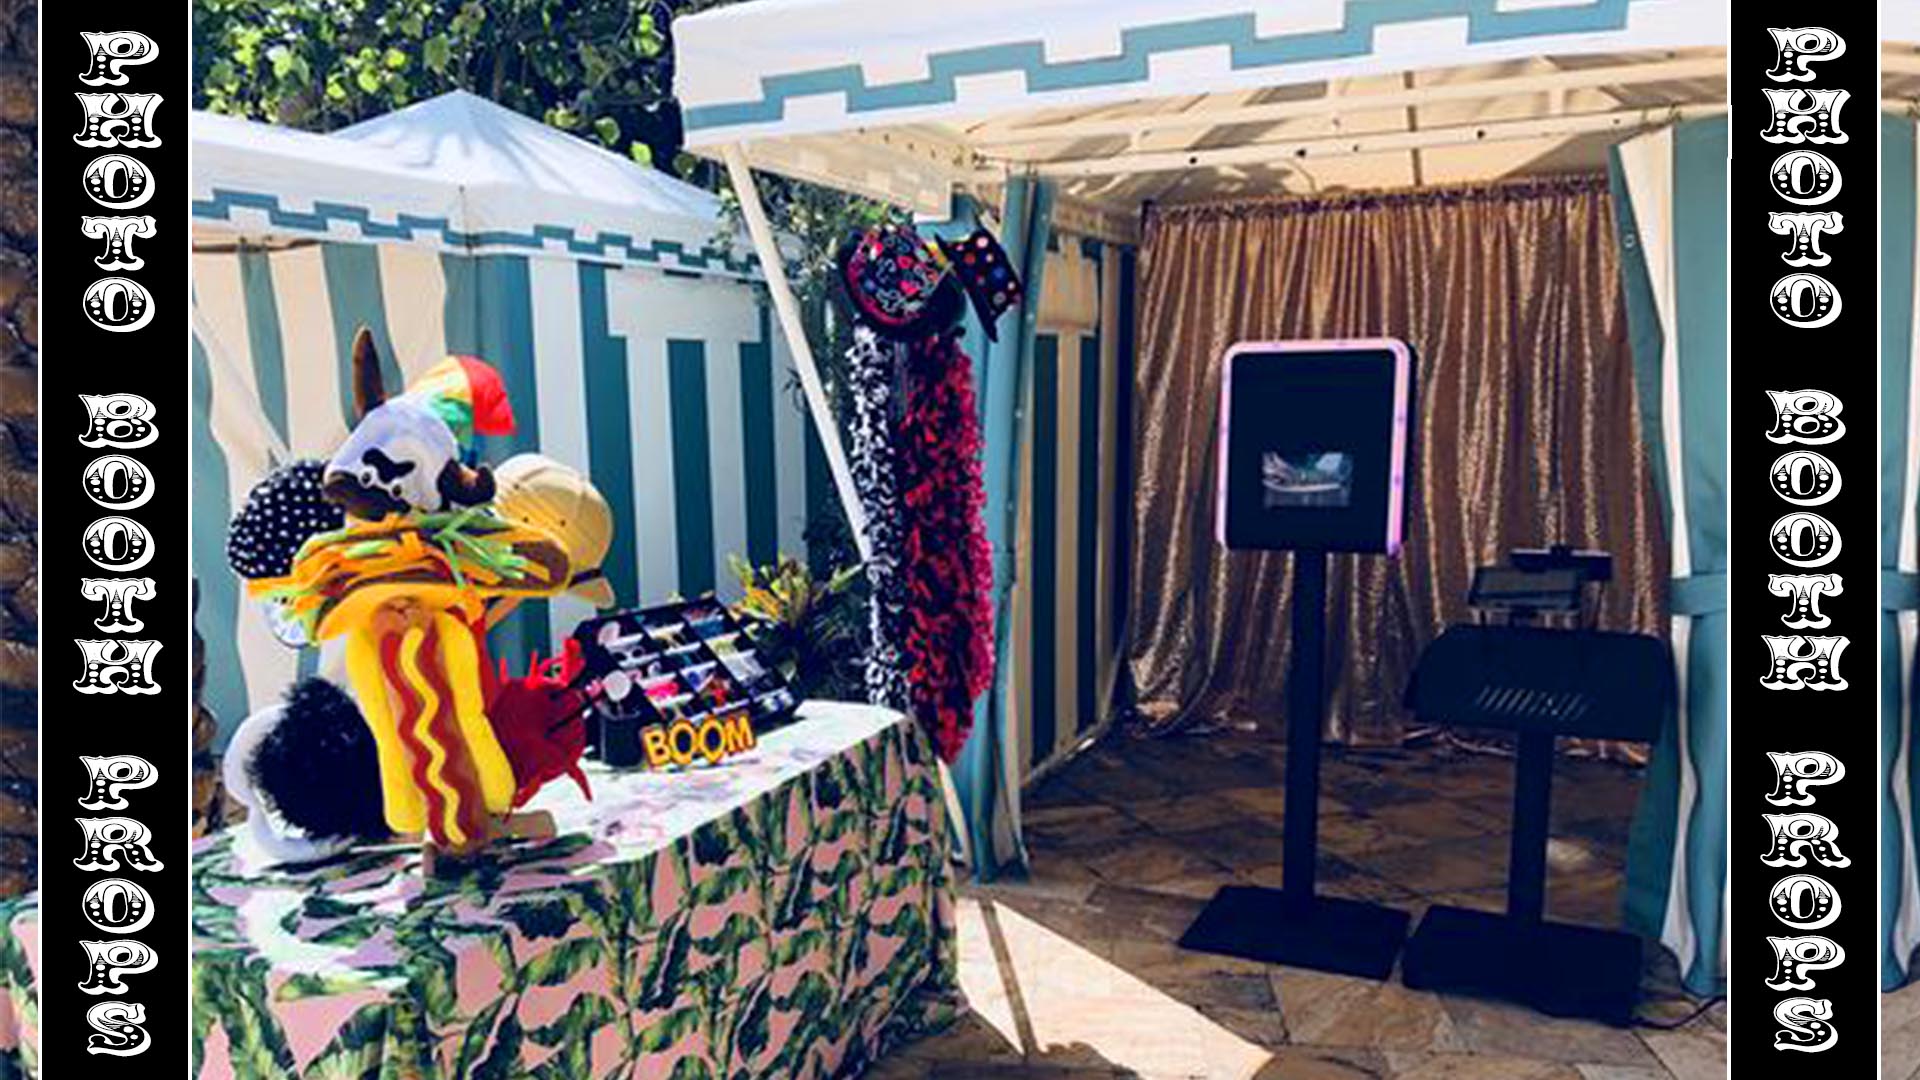
PHOTO BOOTH ATTENDANT:
You'll be scheduled to meet at your party 30-90 minutes before it starts depending on which photo booth you're setting up.
We give you a little extra time to set up the photo booth so you don't have to rush and in case the photo booth
has a problem and you need to troubleshoot or call us.
BEFORE THE PARTY:
1) Ask for a 6' table for your props and scrapbook. Do this 1st!
2) Find out where you are setting up the photo booth and set up your photo booth backdrop.
(click for backdrop samples)
3) Build the photo booth and run power to it. (dont tape the cord down yet)
4) Connect to the internet using the venues wifi or our hotspot.
5) Run the photo booth software and do a test photo of yourself to make sure everything works.
A) Text the photo to your phone to make sure the wifi works.
B) Print the photo to make sure the printer works.
Now it's time to make adjustments to improve the quality of the photos!
6) Crop your backdrop to only show the backdrop and not the floor or wall behind the backdrop.
Physically move the photo booth apx 6' from the backdrop, you can also adjust the camera's zoom.
BAD CROP JOB GOOD CROP JOB

The 2 samples above were taken with the same photo booth. (Picbox)
The left sample is a bad crop job b/c you can see the floor and the bottom right edge of the backdrop exposing the wall behind it.
The photo on the right is a better crop job b/c you don't see the floor or anything around the backdrop.
The sample above also shows how important lighting is. The left photo is too dark compared to the right photo.
It is also important not to zoom too far out b/c the guests will appear tiny.
These adjustments become instinctive once you understand what a good photo looks like.
7) Now adjust the camera settings b/c every party has different lighting conditions.
We don't want good photos, we want great photos! NEVER skip this step.
To start, 1st take a photo of the settings in case you make a mistake,
THEN Adjust the camera settings and print samples as you make adjustments until you are satisfied.
Don't just focus on how the pics look on the screen, focus on how the printed photos look!
CLICK HERE for CAMERA SETTINGS
8) Once the photos look great and you don't need to move the photo booth, tape down your extension cords.
By now you should have received your prop table. (this is why it's the 1st thing you do!)
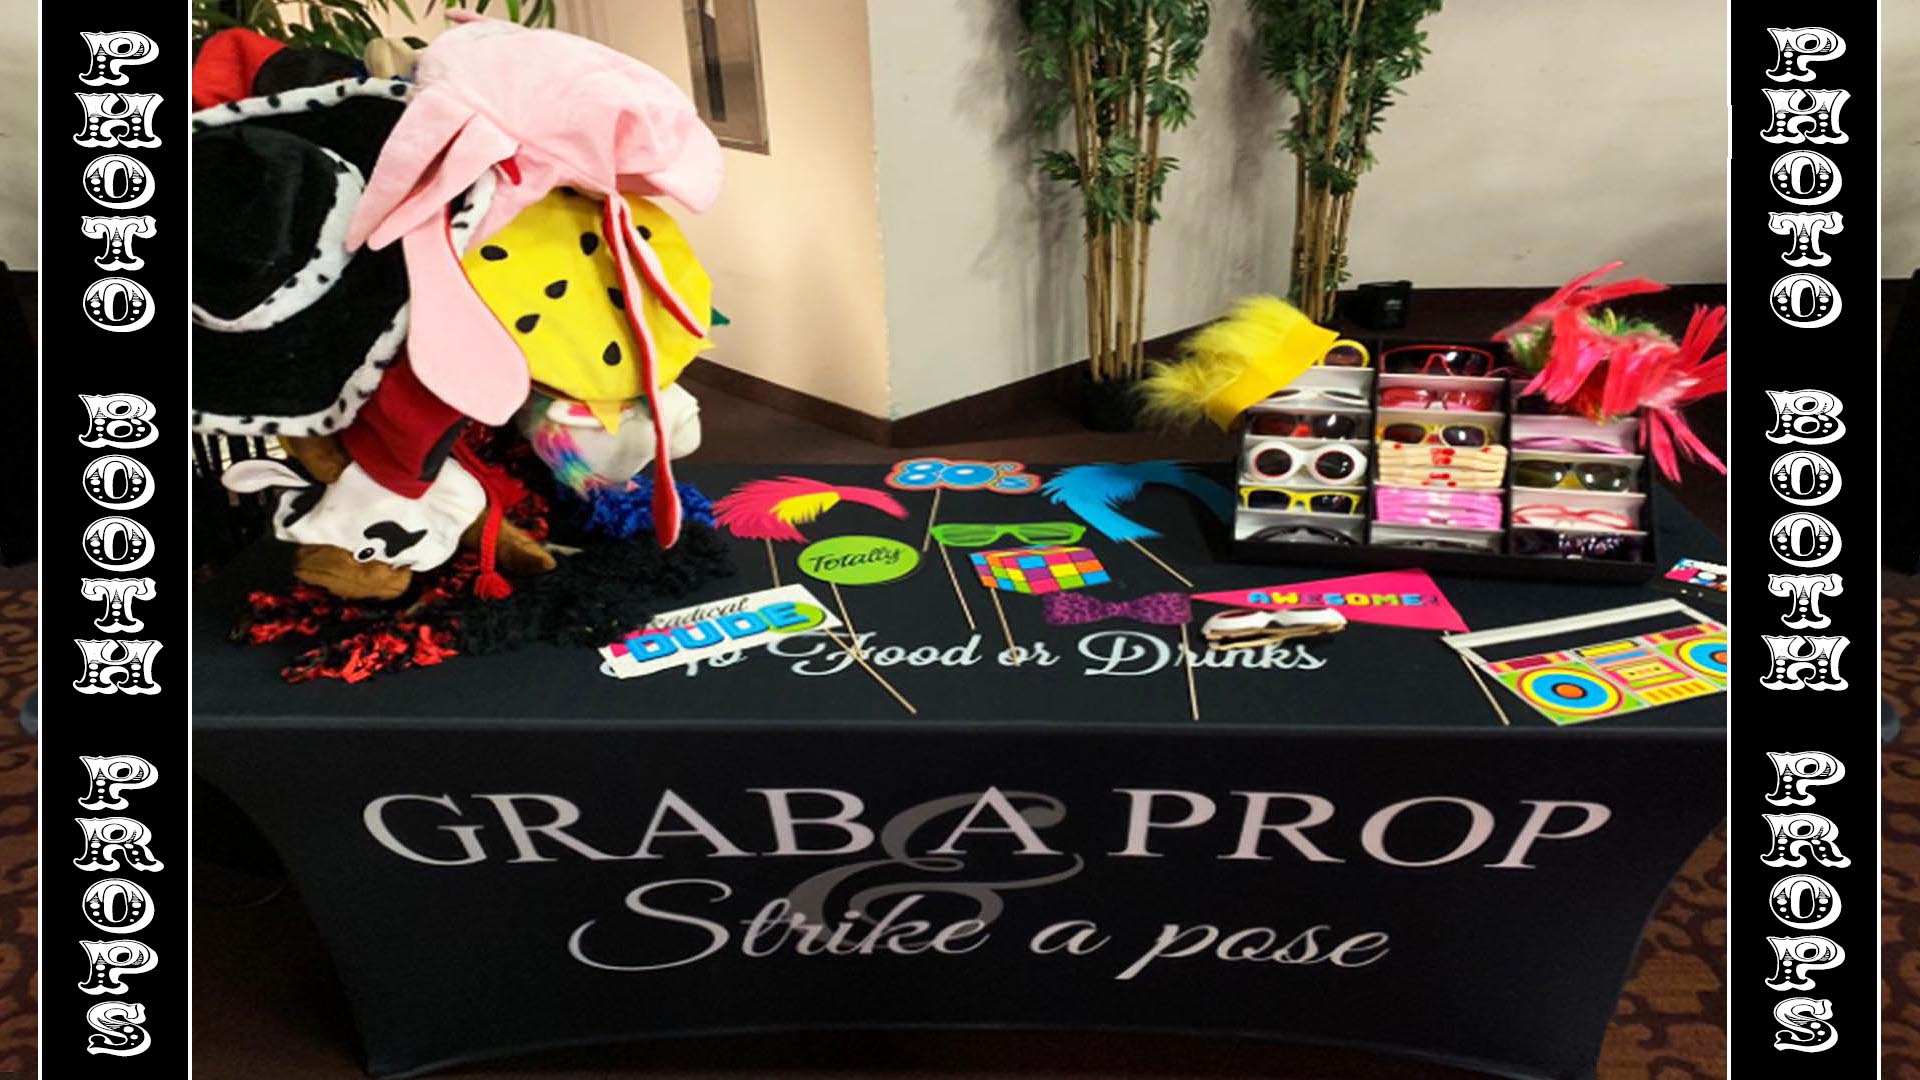
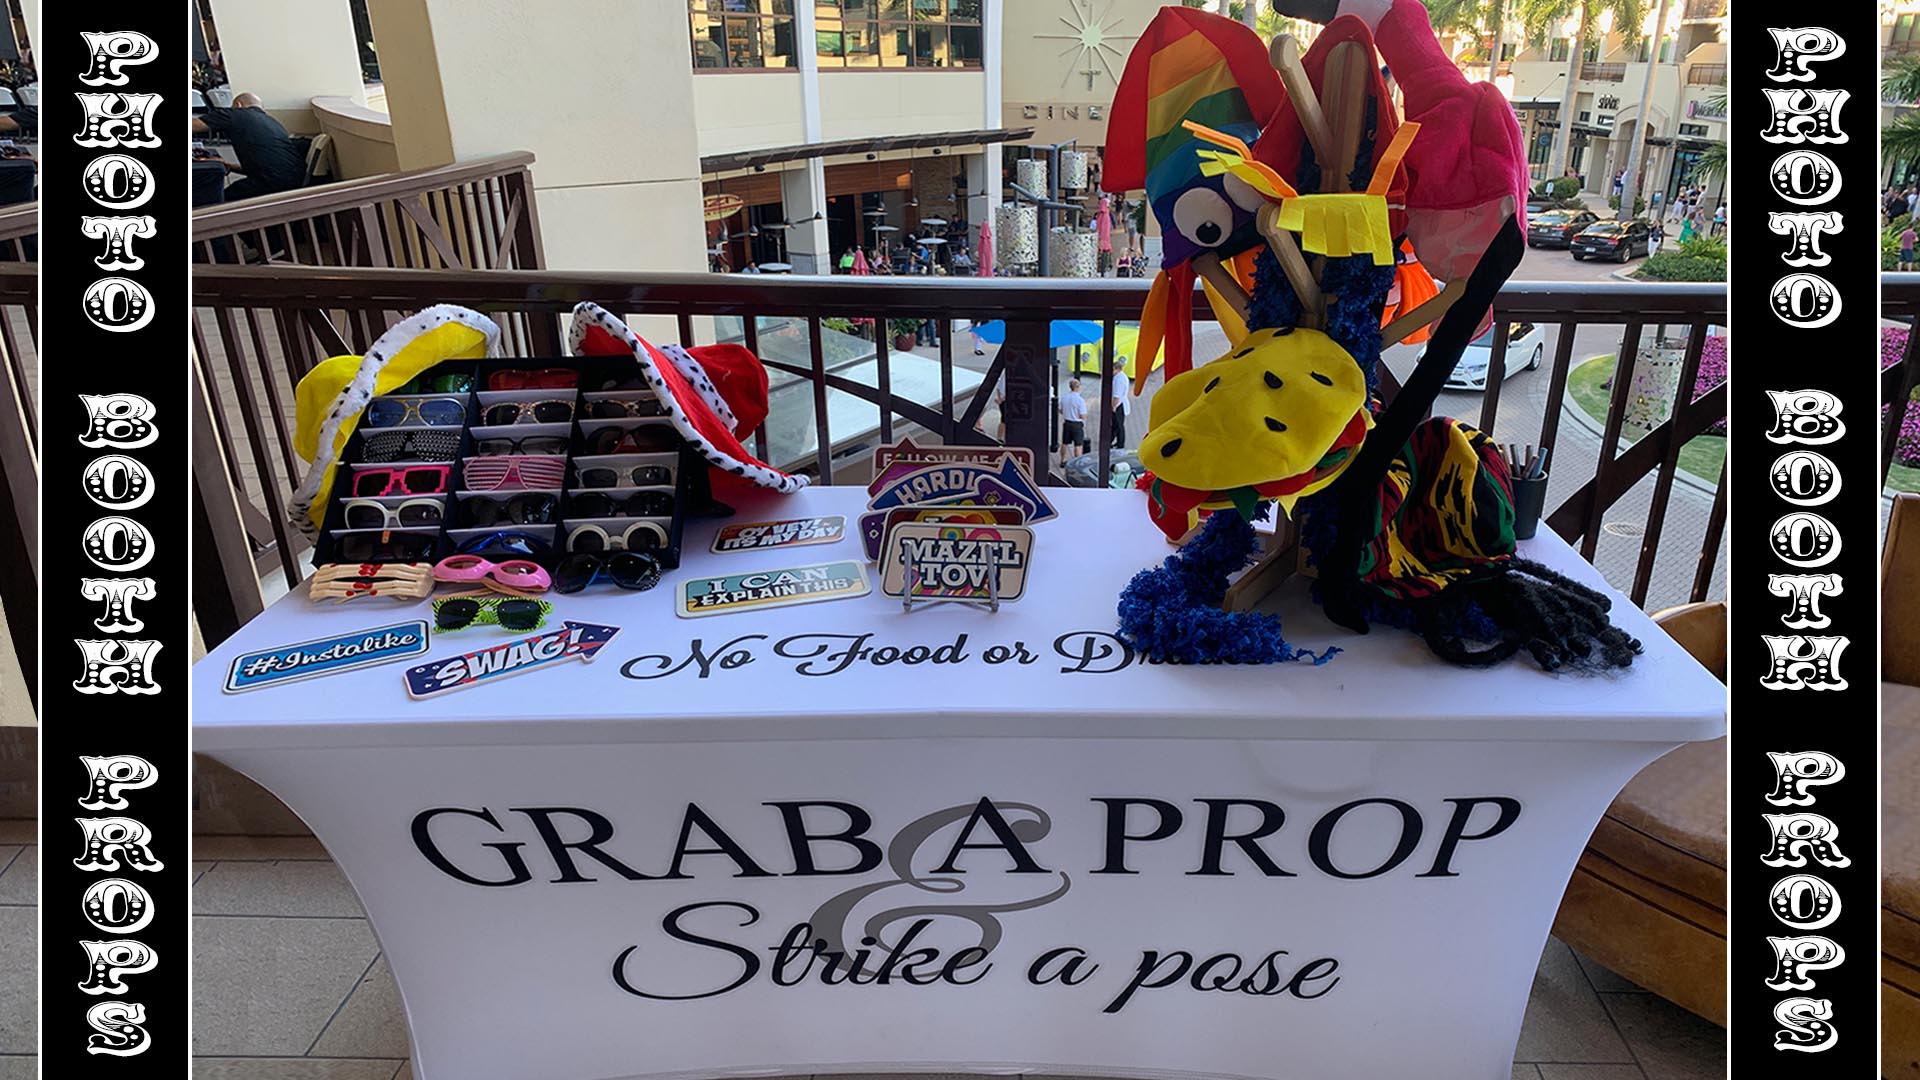
9) Set up your props and scrapbook in a fun creative way. See samples below
10) Clean up your trash and put away any road cases or bags.

DURING THE PARTY:
1) Explain to guests how to use the photo booth (ex. older guests or children need help)
2) Encourage guests to use the photo booth if the booth is not busy
3) Make sure guests put the props & signs back for the next guests to use
4) Shut down the booth during speeches/presentations
RING ROAMER: Check the queue every hour to make sure the photos are still sending.
5)
Change the ink/paper if you run out
6) Occasionally check the prints to make sure they look good (ex. is there a smudge on all the pics b/c
someone touched the camera, or someone moved the backdrop)
6) Encourage guests to print an extra copy and put it in the scrapbook and write a message
7)
Make sure the scrapbook is full by end of party
8)
Give the scrapbook to the client when the party is over
AFTER THE PARTY:
1) Copy the photos onto a flash drive.
2) Give the flash drive AND scrapbook to the client.
3) Pack up photo booth and put away all props, extra paper/ink, and backdrop.
4) Clean all trash, dishes from your area.
If there is a problem call Eric 954-612-7431, Luis 561-331-9680, or Josh 561-303-4899
If a scrapbook is ever damaged or covered with vulgar images you still need to give it to the client and explain rather than throw it away and give the client nothing! Tell the client we will email them a copy of all their photos.
TROUBLE SHOOTING:
PROBLEM- Software not working correctly or freezing up.
SOLUTION- Quit the program and reopen it. If this does't work, restart the PC
(Restarting a PC is NOT the same as shutting it down and turning it back on!)
PROBLEM- Camera is not working or detected
SOLUTION- 1) Turn the camera dial on/off to restore camera power, 2) If camera is not turning on make sure camera's power supply is plugged in and connected to the cameras battery compartment. 3) make sure the camera's USB is plugged in to the camera on one end and in the PC on the other end. 4) carefully unplug both ends of the USB cord connecting the camera to PC to reesablish a connection. 5) quit and restart the photo booth program. Note: Some photo booth programs take over the camera causing it to look like it is turned off. To check this, just quit the photo booth program and then turn the camera off/on.
6) Never change the camera settings on the cameras dial, but if you did then change it back. Usually it is set to "M" for Manual. if you change this dial it can cause the photo booth program to freeze or quit when it takes a photo.
PROBLEM- Printer is not detected or printing.
SOLUTION- 1) Make sure printer is powered on (green light on front of printer)
2) If the printer is powered on and any other lights are on this indicates an error with the printer
and you must open the printer and fix the Ribbon & Paper.
3) Make sure the printers USB cable is securely connected to the back of printer and the other end is
connected to the pc. Always plug the printer cord into the same usb plug on the PC or it wont work. If needed carefully unplug and replug the USB cords to restablish the connection.
4) Restart the pc (not shutdown, RESTART) with cables still connected.
5) Go to your PCs settings and access the "Control Panel" settings and then click on "devices & printers" and make sure
your printer is listed and set as the "default printer".
To do this left click on the printer to select it,
then (after you select it) "right" click the printer to bring up the menu and scroll down to "select as default printer"
and left click it to select it (this will put a check mark next to it) so now it is the defult printer.
Note: if you cannot get the PC to list your printer under "devices & printers" when its plugged in then you need to go the manufacturers website and reinstall the printer driver(s). http://dnpphoto.com/en-us/Support/Downloads/Drivers-Tools
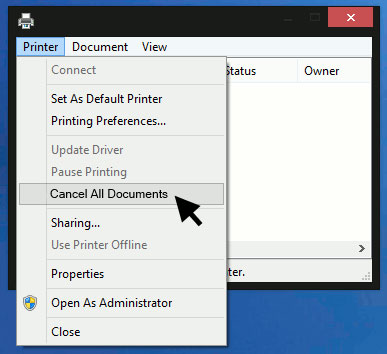
6) The last step to fix a stopped printer is to delete all print jobs from all of the other printers.
We need to cancel all the other print jobs from all the other printers in case the pc is trying to
print something before it prints from your printer. For each of the other printers listed under
"devices & printers", left click on each printer icon to select that printer, then right click that printer
to bring up the same menu above and click "see what's printing", this will show if there are items waiting to be printed.
If there are no documents listed skip to the next printer. If there are documents listed click "cancel all Documents"
to delete them which will cancel those print job(s). There may be a delay before the documents are canceled
or you may need to open and close this menu once or twice before the document(s) disappear from the list.
Once you confirm all the printers are not trying to print anything start the photo booth program up and do a test print.
GRATUITY / TIPS:
33% of clients will tip you no matter what,
33% of clients will not tip you no matter what,
33% of clients will tip you if you do a great job...so increase your odds!
If your just a body standing around looking at your phone and only helping if asked do not expect to get tipped. If you are very helpful and the client notices, you'll get tipped more! Suggestions below will help you get tipped more.
1. Dress Professional and Smile
2. Introduce yourself to the family before the party starts, For example, "Hi my name is______ and I will be running the photo booth tonight, are you guys excited b/c I want you to have a great time and not worry about anything. You guys look great, are you ready to have fun?" Mom, your dress is beautiful, Hi-Five the little brother, etc...!
3. Be friendly and interact with the guests, and pay special attention to the family members, especially the ones who are paying.
4. In the middle of the party ask the hostess if everything is great, and "do you need anything?"
Remember ask Mom b/c she controls Dad
5. 10 mins before you finish ask mom if she wants a family photo before you close. Dress them up with some great props and signs, put extra effort into this last photo...they'll remember how much you cared!
6. When the party ends copy the photos onto a flash drive and finish the scrapbook. Wait for an opportunity to go over and thank the parents for hiring you. Congratulate them on a successful party and tell them how great it was. At this point, most clients that are going to tip are thinking about how much to give you while you are talking to them. Just keep engaged in some friendly conversation and it should become apparant to them that you are expecting a tip which will assist in nudging them to take care of you. At this time give them the scrapbook and flash drive with the photos. ChaChing!
EATING/ DRINKING/ SMOKING
There is absolutely No Smoking, Eating, or Drinking allowed in front of guests. You should always eat before you go to work and never expect to be fed. However, with the consent of the client or company that hires us, we may be allowed to eat or drink, but never do it in front of guests. Remember we are working. Leave the room when you grab a soda or something to eat. There is also a correct time to eat. For example, we are hired to run a photo booth for 4 or 5 hours so you wait for a slow time and never eat before the guests. Alcohol consumption is strictly prohibited at all events. You are never to go to the bar and ask for alcohol, even if a guest or the host offers it. It is unprofessional and if other potential clients observe this we can lose jobs!
------------------------------------------------------------------------------------------------------------------------
DELIVERY STAFF:
Make sure all games have an extension cord and they are plugged in and tested to make sure the games work.
Tape all games down so no one trips over cords, and make sure the tape is neat.
Do NOT just power the game on and think that's enough. You must start a game and make sure the game works. For example, if you dont start the LED air hockey game then you wont know if there is a puck loaded in the game. If you don't start a pinball game the game may not eject the pinball. If you ever notice something wrong with a game and you cannot fix it, immediately text the problem to Eric so he can fix it or deliver a substitute game. There should always be at least 1 attendant onsite for every party in case of problems. You should always hide a "631" key on one of the games at each party for the attendant so they can access the games. Make sure to hide the key from the kids or they will take it.
CLICK HERE FOR THE DELIVERY STAFF TRAINING GUIDE
Pinball Machine & Pinball Dolly
Super Chexx Hockey (set up)
-Set up Freeplay
-Adjust Ejector Strength
Xbox Arcade- Syncing Controllers
How to set up a Prop Table for a Photo Booth
Camera Settings, Definitions, & Adjustments
Capture Pod Photo Booth - Photo Booth Set Up
Capture Pod Photo Booth - Program Set Up
Capture Pod Photo Booth - Changing Paper (DNP DS620)
Capture Pod Photo Booth - Turn Road Case into Prop table
Capture Pod Photo Booth - Strike
Dog Tag Engraving Machine Instructions
Doodle Booth Photo Booth
Camera Set Up Cue to 3:05, Ipad Set Up Cue to 17:30
FOBO Booth
SET UP FOBO BOOTH 0:00
PRINT STATION 6:00
CHANGE PAPER 11:16
OPENING PHOTO BOOTH (fix loose wires or loose camera): 17:27
FOBO SOFTWARE: 19:00
LOAD LOGO: 20:00
EMAIL/TEXT: 23:33
CAMERA SETTINGS: 24:10
SHUTDOWN & BREAKDOWN BOOTH: 29:43
Funstop Photo Booth Programming Set Up
PART 1
PART 2
Funstop Photo Booth Attendant: Always confirm both cameras are saving the photos
Funstop Photo Booth- Changing paper/ink & "Printer: no paper" red warning screen
Funstop Photo Booth: How to unfreeze the start up screen (pc laptop required)
Borrow laptop from DJ, Photographer, Caterer or locations office, or anyone!
Funstop & Snapshot Photo Booth-Changing paper/Ink
Flipbook Trouble Shooting Printer (this is not for photo booths)
Green Screen Software (this is not for photo booths)
Green Screen Laptop using Photo Party Upload (PPU)
Manually Connect PPU Helper (PPU)
(if autoconnect isnt working)
House Of Mirrors -Setting up LED Lights
ID Card System (ID Card Printer and software settings) (this is not for photo booths)
Inflatable Photo Booth Enclosure Set Up & Strike
Inflatable Vogue Booth with LED Lights
Instacam- Set Up part 1&2
Instacam- Set Up part 3 (Program)
Instacam- changing paper/Ink (DNP-RX1)
Instacam- changing sticker paper/ink (Brava 21)
iPhone Booth Disable Setting Menu
iPhone Booth Camera Angle & Lighting adjustment
iPhone Booth Printer Access and Changing paper on DNP-RX1
iPhone Booth Shutdown Procedure
Jumbo Photo Strips
Round Spandex Enclosure Frame Set Up Part 1&2
Round Spandex Enclosure Fabric Wrap Set Up Part 1-8
LED Photo Booth Set Up & Strike
LED Photo Booth Switching design & Print out
LED Photo Booth Changing Paper/Ink
LED Photo Booth- Saving client photos to Flash Drive
Mirror Me Photo Booth LED Picture Frame Lights
Mirror Me Booth -Changing The ink/Paper (DNP-RX1)
Mirror Me Booth -Changing The Logo
Photo Shoot Photo Booth Set Up
Retro Photo Booth Set Up & Strike
Ring Roamer (Blue Tooth Model)
Salsa Photo Booth Software Start
Snapshot Photo Booth Change Paper & Ink
Snapshot Photo Booth Strike
SuperBooth Photo Booth Set Up & Strike
SuperBooth Photo Booth- changing paper/Ink
Camera Settings, Definitions, & Adjustments
---------------------------------------------------------------
4-PLAYER MULTICADE
SET UP & STRIKE (BREAKDOWN)
Backup youtube link
---------------------------------------------------------------
AIR HOCKEY
Backup youtube link
---------------------------------------------------------------
ANTI-GRAVITY
Backup youtube link
---------------------------------------------------------------
BASKETBALL POP A SHOT
Backup youtube link
---------------------------------------------------------------
BASKETBALL PRO ARCADE
Backup youtube link
---------------------------------------------------------------
BOXER PUNCHING ARCADE MACHINE
Click here for manual
Just plug game in to start, there is no power switch.
Make sure punching bag is in "up" position when you unplug it, so
if a guest started a game and the punching bag drops you need to punch it so it goes up. THEN unplug it.
FREEPLAY:
1. OPEN COIN DOOR
2. PRESS “START” BUTTON. BOTTOM LED DISPLAY WILL BLINK.
3. PRESS “UP” OR “DOWN” BUTTON UNTIL BOTTOM LED DISPLAY SAYS “9”.
4. PRESS “START” THEN TOP LED WILL BLINK. PRESS “UP” or “DOWN” BUTTON UNTIL TOP DISPLAY SAYS “1”.
(1=FREEPLAY, 0=MONEY REQUIRED).
5. PRESS “START” AGAIN TO CONFIRM FREEPLAY THEN BOTTOM DISPLAY WILL BLINK.
6. PRESS "UP" OR “DOWN” BUTTON UNITL BOTTOM LED DISPLAY SAYS “0”
7. PRESS “START” TO EXIT OUT OF MENU AND IT WILL AUTOMATICALLY RESTART GAME.
RESET HIGH SCORE (700 is the reset value)
1. OPEN COIN DOOR
2. PRESS “START” BUTTON. BOTTOM LED DISPLAY WILL BLINK.
3. PRESS “UP” OR “DOWN” BUTTON UNTIL BOTTOM LED DISPLAY SAYS “7”.
4. PRESS “START” SO TOP DISPLAY BLINKS. PRESS “START” A 2ND TIME TO SAVE AND RESET SCORE TO 700.
BOTTOM DISPLAY WILL NOW BLINK.
5. PRESS "UP" OR “DOWN” BUTTON UNITL BOTTOM LED DISPLAY SAYS “0” THEN PRESS “START” TO EXIT OUT OF MENU AND IT WILL AUTOMATICALLY RESTART GAME.
MAKE THE MACHINE EASIER OR HARDER:
1. OPEN COIN DOOR
2. PRESS “START” BUTTON. BOTTOM LED DISPLAY WILL BLINK.
3. PRESS “UP” OR “DOWN” BUTTON UNTIL BOTTOM LED DISPLAY SAYS “17”.
4. PRESS “START” THEN TOP LED WILL BLINK. PRESS “UP” or “DOWN” BUTTON UNTIL TOP DISPLAY SAY
“1” (EASY), “5” (MEDIUM), “10” (HARD).
5. PRESS “START” AGAIN TO CONFIRM DIFFICULTY THEN BOTTOM DISPLAY WILL BLINK.
6. PRESS "UP" OR “DOWN” BUTTON UNITL BOTTOM LED DISPLAY SAYS “0” THEN PRESS “START” TO EXIT OUT OF MENU AND IT WILL AUTOMATICALLY RESTART GAME.
---------------------------------------------------------------
BOWLER ROLLER
(new model with electric bell)
Backup youtube link
---------------------------------------------------------------
CATCH THE LIGHT
Backup youtube link
---------------------------------------------------------------
CLAW MACHINE
Backup youtube link
---------------------------------------------------------------
LED CLAW MACHINE
Backup youtube link
---------------------------------------------------------------
CORNHOLE -Part 1
UNPACKING THE CASE
Backup youtube link
CORNHOLE -Part 2
CHARGING & USING THE BATTERY
(ONLY USE THE BATTERY IF REQUESTED, OUTLET IS MORE RELIABLE)
Backup youtube link
After watching the above video read this:
At the end of the party when you disconnect the wire that connects the game to the battery terminal, CAREFULLY disconnect that wire from the battery terminal by grabbing the red connector part of the cable (not the bare wire) to pull it off the battery terminal (see pic below), do NOT disconnect it by yanking the wire or you will rip the wire out from the red connector and then YOU will have to fix it.

Backup youtube link
CORNHOLE -Part 3
USING THE POWER CORD
Backup youtube link
CORNHOLE -Part 4
SETTING UP THE GAME
Backup youtube link
When you set the game up on any hard surface (tile, concrete, pavers) do not drag the game or set it down upside down when you take it out of the case or you will scratch it.
CORNHOLE -Part 5
GAME RULES- HOW TO PLAY
Backup youtube link
CORNHOLE -Part 6
PACKING UP THE GAME
Backup youtube link
At the end of the party carefully disconnect all cables, Do not rush and start yanking cables w/o thinking b/c you can break the connectors and then you will pay to fix them.
At the end of the party when you disconnect the batteries from the game wire CAREFULLY
disconect the wire from the battery terminal by pulling it off from the connector, do NOT pull it off by yanking on the wire itself or you will rip it and then you will have to fix it.
Yes, I said it twice!
---------------------------------------------------------------
COTTON CANDY MACHINE SET UP
Backup youtube link
---------------------------------------------------------------
DART ARCADE MACHINE SET UP
Backup youtube link
---------------------------------------------------------------
GENERATOR TUTORIAL -HONDA
Backup youtube link
---------------------------------------------------------------
HOMERUN DERBY

Backup youtube link (coming soon)
Dip Switch Settings for Bat:
UP=ON, DOWN= OFF
Position 1 is UP
Position 2, 3, 4 is DOWN
1. Make sure USB plug for bat is plugged into PC
2. Restart Game program
3. Test bat by swinging is FAST (Bat will NOT work if u swing it slow)
---------------------------------------------------------------
HOOP IT UP
Backup youtube link
---------------------------------------------------------------
IPS (Interactive Play System)
Instructions:

IPS SYSTEM CONFIGURING THE GAME -GENERAL VIDEO
YOUTUBE LINK
IPS SYSTEM- 1 UNBOXING INSTRUCTION
YOUTUBE LINK
IPS SYSTEM- 2 CHARGING INSTRUCTION
(how to charge sensors {game discs} and scoreboard
)
YOUTUBE LINK
IPS SYSTEM- 3 CONNECT / DISCONNECT INSTRUCTION
(pairing game discs for each team)
YOUTUBE LINK
IPS SYSTEM- 4 SWITCHING SYSTEM ON / OFF
(prop method to turn game on or off)
YOUTUBE LINK
IPS SYSTEM- 5 CHOOSING TEAM MODE INSTRUCTION
1P- all discs are 1 color for 1 player game and scoring
2P- all discs change color for both teams colors so it's changing targets for 2 player game and scoring.
2P 2P-
all discs don't change color for both teams so it's set targets for 2 player game and scoring.
YOUTUBE LINK
IPS SYSTEM- 6 HIT OR MISS INSTRUCTION
Set game to IPS or HIT
IPS- games are focused on touching the spots by hand.
HIT- games are focused on using balls or projectiles to hit the spots.
YOUTUBE LINK
IPS SYSTEM- 7 SENSOR MODE INSTRUCTION
(game discs sensitivity set to touch, hit, or touch & hit)
YOUTUBE LINK
IPS SYSTEM- 8 SENSOR SENSITIVITY INSTRUCTION
(game disc sensitivity to low, normal, high)
YOUTUBE LINK
IPS SYSTEM- 9 CHOOSING THE START SPOT INSTRUCTION
(setting up which game disc will be the start button)
YOUTUBE LINK
IPS SYSTEM- 10 SETTING THE GAME TIME INSTRUCTION
(adjusting game time duration)
YOUTUBE LINK
IPS SYSTEM- 11 ADJUSTING VOLUME
YOUTUBE LINK
IPS SYSTEM- 12 TURNING OFF BACKGROUND MUSIC
YOUTUBE LINK
IPS SYSTEM- 13 CHARGING INDICATION DISPLAY OR NOT
(turning the charge indication (LED light) on or off so you know charge levels)-leave this setting on!
YOUTUBE LINK
IPS SYSTEM- 14 SETTING THE STANDBY TIME
YOUTUBE LINK
IPS SYSTEM- 15 REVERSING TEAM SCORING
(when your game disc
is pressed the other team gets points instead of your team)
YOUTUBE LINK
IPS SYSTEM- 16 ERROR CODES LISTING
(defines what each error code means)
YOUTUBE LINK
IPS SYSTEM- 17 DISCONNECTING SCOREBOARD FROM ROADCASE
YOUTUBE LINK
---------------------------------------------------------------
JUKEBOX
Backup youtube link
To play jukebox music on external speakers look at the rear side of the jukebox. On the right side there are a bunch of speaker connections. There are 3 sets of Stereo RCA output connections. Use the top pair for more volume, or bottom pair labeled "mixed audio" if they have a DJ. Then run the other end of their cables to their mixer or speakers.
---------------------------------------------------------------
MAZE RUNNER
Backup youtube link
---------------------------------------------------------------
MONEY MACHINE
Backup youtube link
MONEY MACHINE RULES:
SET UP
Put up to 300 bills in at a time, but not more or it wont blow as fast and will pile up on the floor.
Remove old bills that are ripped up and add new bills which are stored in the back door
of the money machine. You have to crinkle up the new bills or the money wont blow around well.
If the client is providing real money ask them how many real bills they are providing us,
we usually mix real money with fake money so it lasts longer.
Slowly add the money so it lasts the 1 hour or 4 hours.
The door on the machine must be closed for it to work.
Just push the button on the back of the machine to start it.
It will automatically stop when time runs out. If no one uses it the machine will randomly turn on.
MONEY MACHINE RULES:
1. Rounds are 10-30 seconds (depends on how long timer it is set up) and allow contestants
to grab as much money from the air as possible before time expires.
2. PUT ON GOGGLES FIRST, Enter Money Machine, contestants must stand upright
and cannot bend at the waist or knees to pick up cash from the floor.
Contestants can use their feet to "kick up" cash that may accumulate in the bottom corners
to blow up toward them. Only 1 person can be in the money machine at a time!
3. Cash must be grabbed from the air, you cannot use your clothing to grab the cash or
grab it from the ceiling when time expires.
4. Contestant will be directed to exit Money Machine after time expires, then remove goggles.
DO NOT LOSE THE GOOGLES!
5. REAL MONEY OR PRIZES:
REAL MONEY: If client supplies real money then guests win the real money they catch and you put back the fake money. If client provides $100 for 1 hour then put $25 in every 15 mins so the real money lasts. $400 for 4 hrs, then add $100 every hour. ($25 every 15 mins)
PRIZES: If we supply prizes then contestants have to grab more than a specified amount of fake money to win a prize. (Ex. if they get more then 50 they get a prize, you can make it more or less money to make it easier or harder). There are usually 20 prizes included so make them last. If it seems too easy then raise the amount. Try to save best prize for last!
CAUTION:
Contestant must be in good physical condition to participate. Persons with back, neck, knee or joint injury, respiratory problems or who may be pregnant should not participate. If they are currently under medical care, please consult their physician before participating in this event.
---------------------------------------------------------------
OPERATION
Backup youtube link
---------------------------------------------------------------
PAC-MAN BATTLE ROYALE SET UP
& Volume Adjustment
Backup youtube link
---------------------------------------------------------------
PIANO SET UP & STRIKE
Backup youtube link
---------------------------------------------------------------
PINBALL MACHINE SET UP
Volume Adjustment,
& Using a Pinball Dolly
Backup youtube link
---------------------------------------------------------------
PINBALL (Newer Williams Freeplay Set Up)
Setting Freeplay up on "No Good Golphers"
Free play = Play for free!
Backup youtube link
---------------------------------------------------------------
POWER PONG
Backup youtube link
---------------------------------------------------------------
POPCORN MACHINE SET UP
Backup youtube link
---------------------------------------------------------------
PRETZEL DISPLAY SET UP
Backup youtube link
---------------------------------------------------------------
PUCKER POWDER
Backup youtube link
---------------------------------------------------------------
SUPER CHEXX HOCKEY
Backup youtube link
SUPER CHEXX FREEPLAY:
(Super Chexx Manual
)
Refer to page 7 in the service manual to change the program settings.
Tech Guy:
Press "program button" to enter program mode, press step button repeatedly until it says "0", press "program button" to exit and finish.
Newbie:
Refer to page 7 in the super chexx manual for more info
1. Open Coin Door and locate the 4 program buttons located on the bottom of the main computer board (see Fig 1A).
2. Press the left button "PGM/SW1"
to enter Program mode. (see Fig 1A).
Note: You cannot enter PROGRAM mode during a game. If scoreboard looks like Fig 1B (below) then you're not in Program mode. In program mode the " Time" display on the scoreboard will say "1" (see Fig 1C)
If you cannot get into program mode shut the unit down, wait 5 seconds, turn it back on, wait 10 seconds and press the program button,"PGM/SW1" to enter prgram mode.
3. Press the select button "SEL/SW2" repeatedly to cycle thru the settings 1-9 until it says "1".
Note: it defaults to "1" so you dont have to push the select button.
4. Press the adjustment "STEP/SEL3" button to cycle thru the numbers until it says "0". This number reprents how many coins are required to start a game so changing it to 0 makes gameplay free. Default is 5 if a power surge resets the game.
5. Press the
"PGM/SW1"
to exit Program mode. (see Fig 1A)
6. The game is now in freeplay mode and scoreboard will show FP (freeplay) instead of 00. (see Fig 1D)
SUPER CHEXX PUCK EJECTOR STRENGTH:
If pressing the "Boo" button doesnt eject the puck on to the playfield.
1.
Make sure puck is not on playfield
2. Make sure it is not stuck in the goal
3. Make sure there is nothing in the puck ramp or ejector hole blocking the puck from rolling down the hidden puck ramp and then being ejected on to the playfield.
If there is remove the blockage.
3. Listen to the game and make sure when you press the "boo" button you hear the puck ejector
trying to shoot the puck onto the playfield. If you hear the ejector working and you see the puck in the ejector hole where it shoots it out then the ejector strength needs to be increased. Follow steps 1, 2, above, on step 3 press the select button "SEL/SW2" repeatedly to cycle thru the settings 1-9 until it says "9" which is the ejector strength.
4. Press the adjustment "STEP/SEL3" button to cycle thru the numbers 5-15 until it says at least "10". This number reprents how strong the ejector shoots the puck onto the playfield. A power surge can reset the default to a weaker strength.
5. Press the
"PGM/SW1"
to exit Program mode. (see Fig 1A)
6. The game should now eject the puck harder.
Figure 1A
(Computer Board)
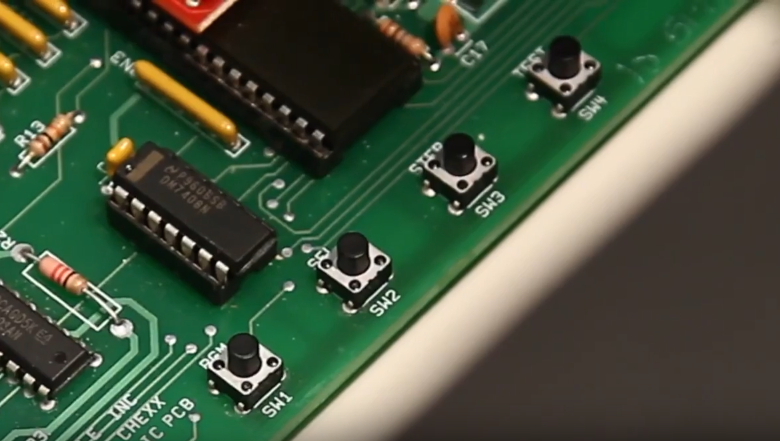
Figure 1B (Game Mode)
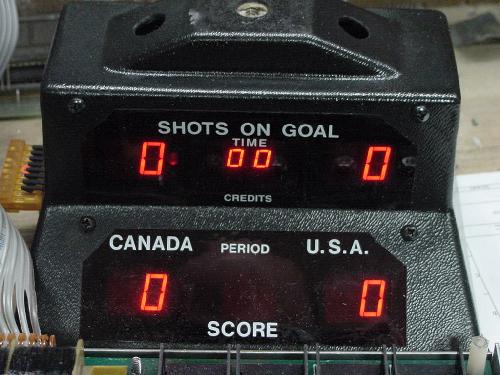
Figure 1C (Program Mode)
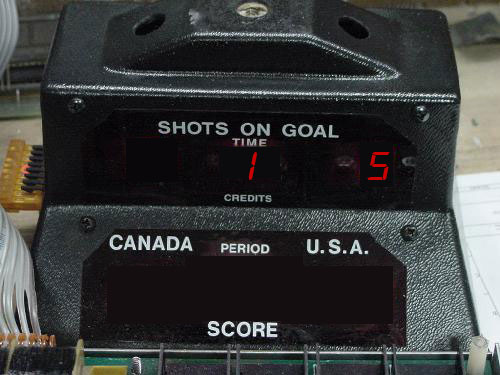
Figure 1D (Freeplay Mode)

---------------------------------------------------------------
SUPER KIXX SOCCER
Backup youtube link
---------------------------------------------------------------
TAP THE APP
Backup youtube link
---------------------------------------------------------------
VERTIGO MULTICADE(Set up)
Backup youtube link
When you're finished and you close the game don't forget to put
the power
cord back in the red bag and lock it in the coin door of the machine.
Proper Machine Shutdown:
1. Press the power button 1x (dont hold it in)
2. Wait for machine to completely turn off.
3. Now you can unplug the power cord.
---------------------------------------------------------------
VERTIGO MULTICADE (How to play it)
Backup youtube link
---------------------------------------------------------------
XBOX ARCADE
Setting Up The machine
Backup youtube link
---------------------------------------------------------------
XBOX ARCADE
Signing Online/Offline
If a game requires you to sign in online to play it.
Backup youtube link
---------------------------------------------------------------
XBOX ARCADE
SYNCING CONTROLLERS
Syncing Controllers
If the controller is blinking and battery is good.
Backup youtube link
---------------------------------------------------------------
ZOLTAR
Backup youtube link
---------------------------------------------------------------
---------------------------------------------------------------
---------------------------------------------------------------
HOW TO SET UP A PROP TABLE FOR A PHOTO BOOTH
Backup youtube link
---------------------------------------------------------------
360 BOOTH GREEN SCREEN SET UP
Backup youtube link
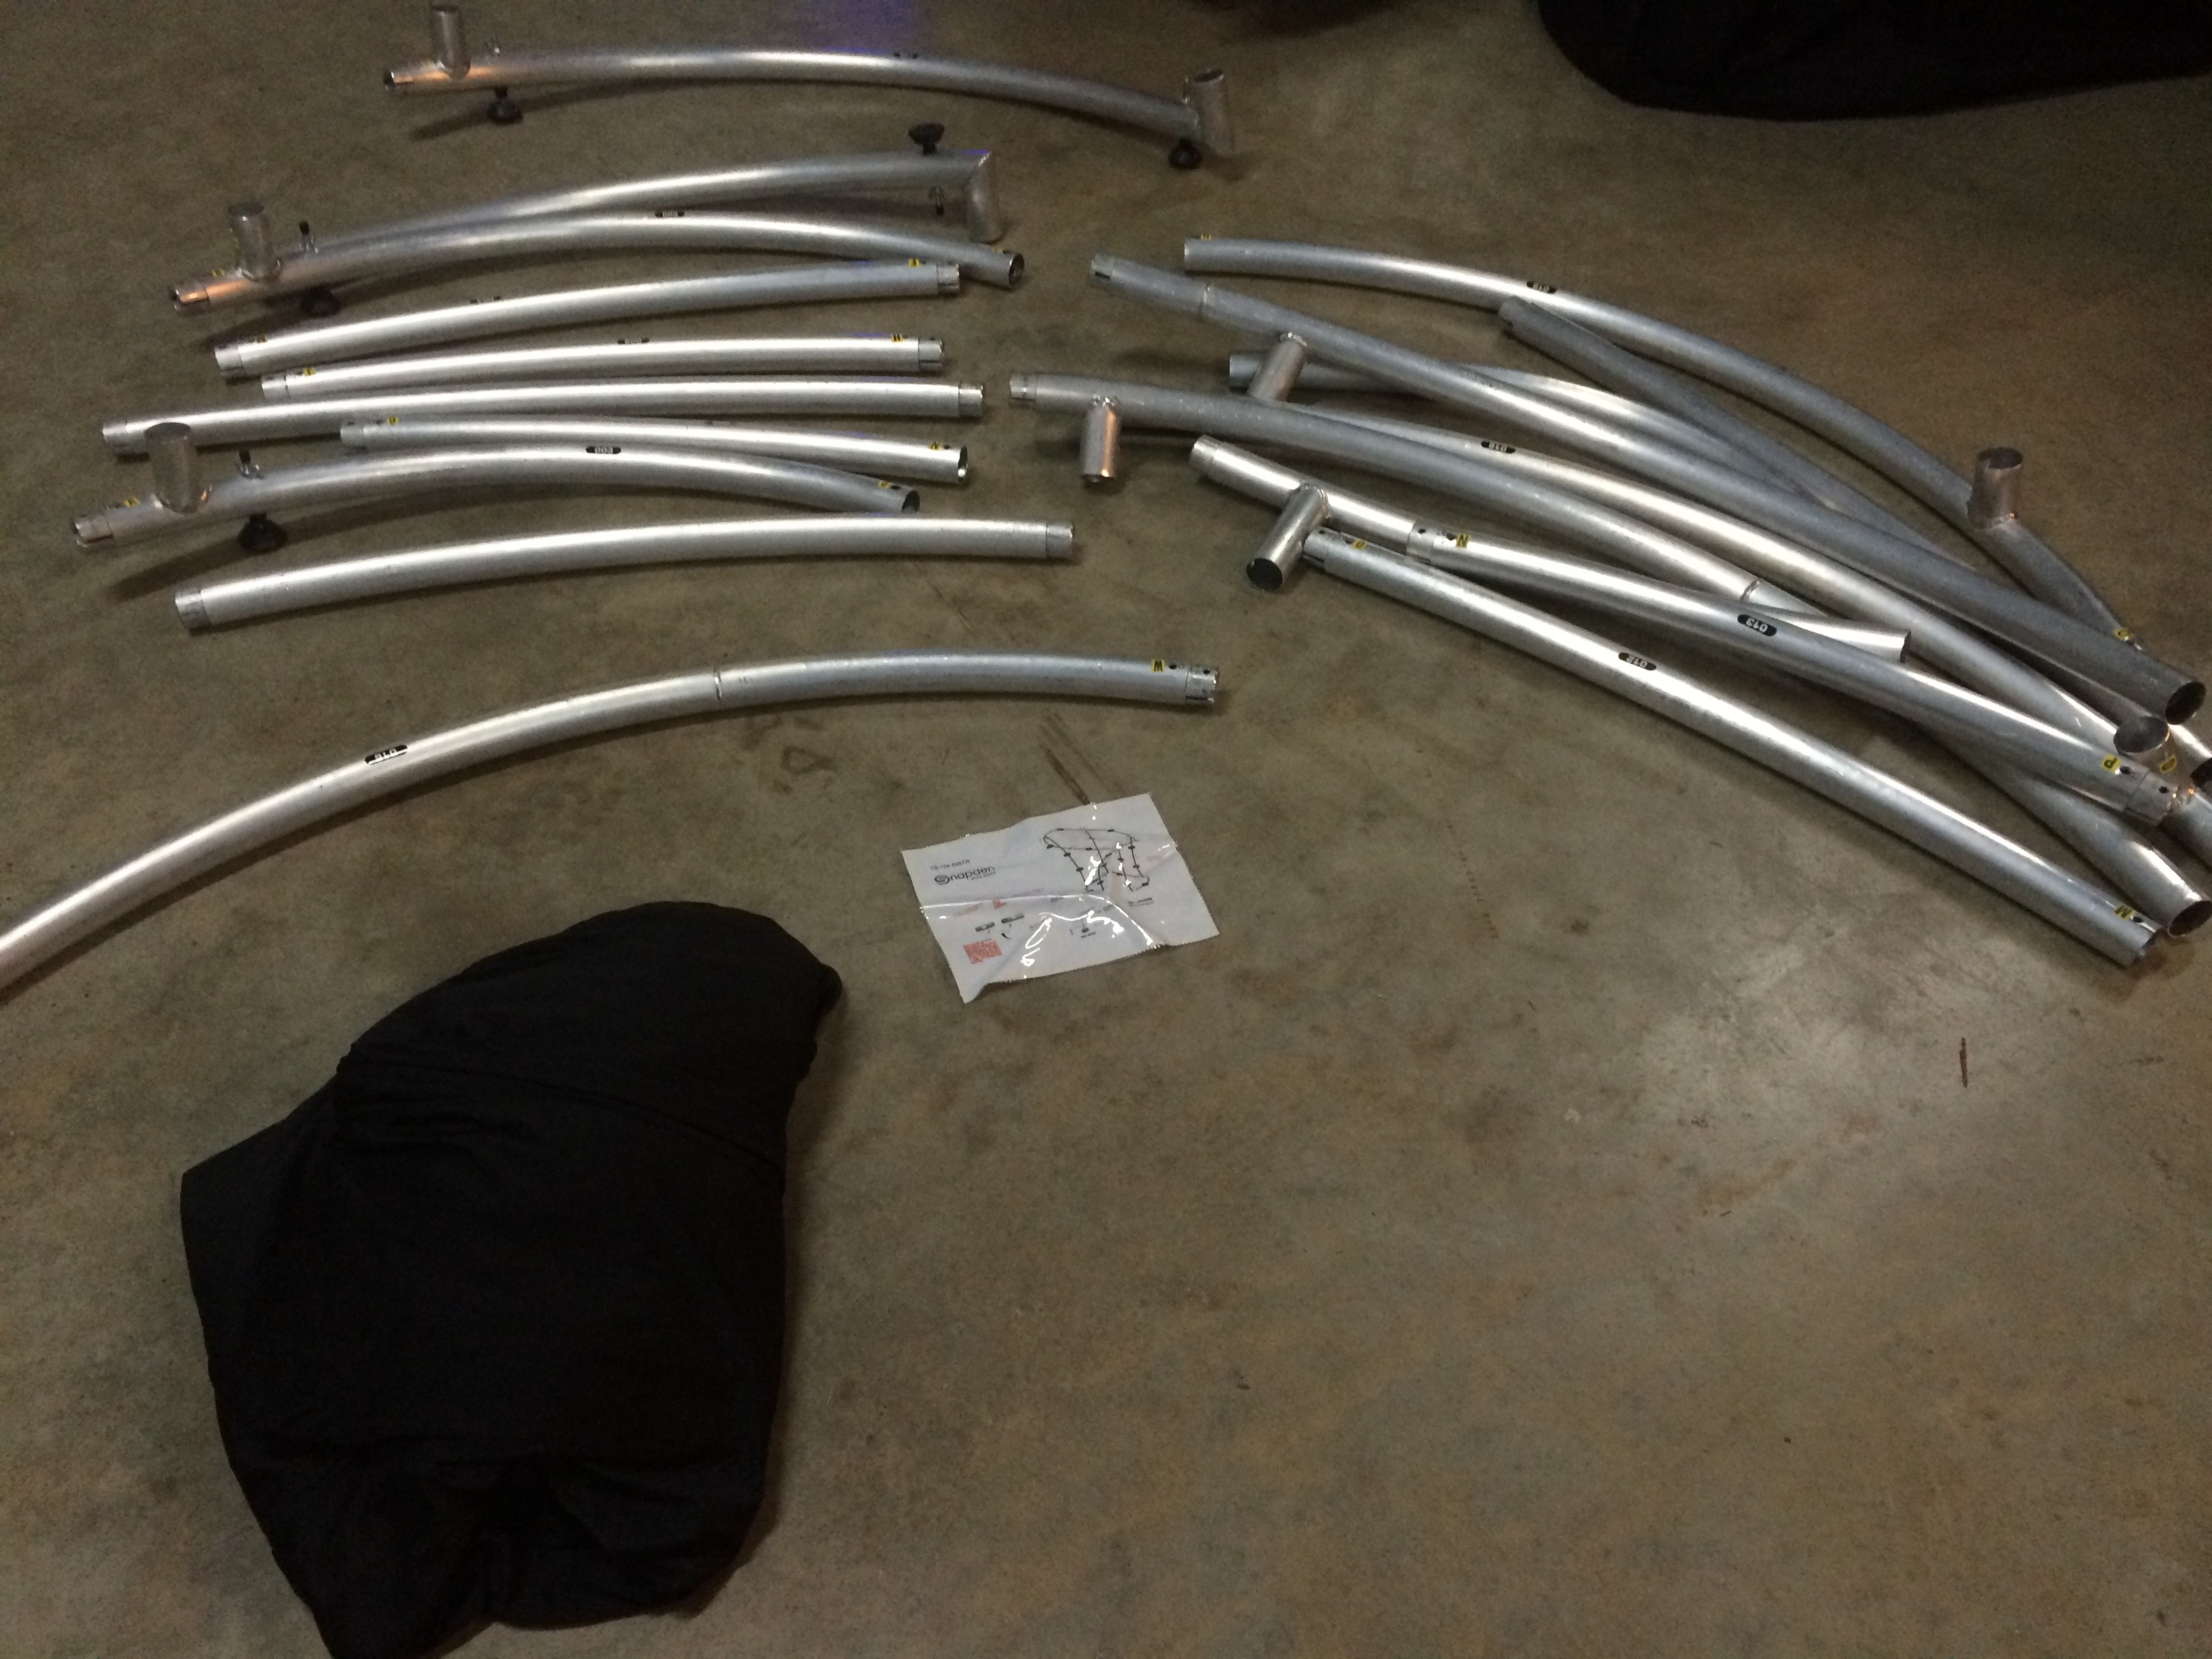
1. Assemble the green screen aluminum frame by connecting all the metal bars. Just look at the ends of all the pieces and attach pieces with the same sticker number. For example, find the 2 metal bars that have a "5" sticker on the end and attach them. Follow this until the entire frame is set up.
2. Take the entire fabric enclosure and unzip it, then drop it over the top of the enclosure and pull fabric down over frame to the floor. Pull fabric over bottom floor bars and zip it. There are 2 zippers (1 on each end) so zip from each end and zippers will meet half way.
3. Make sure green fabric is on inside only and the black doesnt show inside or it will mess up green screen removal effect.
4. Attach the lights on top with clamps and fresh batteries. Use 7 lights as shown in video link.
5. Follow the settings in the video for both the software and Gopro.
---------------------------------------------------------------
360 BOOTH RECOMMENDED SETTINGS

---------------------------------------------------------------
CAPTURE POD PHOTO BOOTH:
PHOTO BOOTH SET UP
Backup youtube link
---------------------------------------------------------------
CAPTURE POD PHOTO BOOTH:
PROGRAM SET UP
Backup youtube link
---------------------------------------------------------------
CAPTURE POD PHOTO BOOTH:
CHANGING PAPER/INK (DNP DS620)
Always Change Ink + Paper together! (Never change just one)
Backup youtube link
---------------------------------------------------------------
CAPTURE POD PHOTO BOOTH:
TURN ROAD CASE INTO PROP TABLE
Backup youtube link
---------------------------------------------------------------
CAPTURE POD PHOTO BOOTH:
STRIKE
Backup youtube link
---------------------------------------------------------------
DOG TAG ENGRAVING MACHINE INSTRUCTIONS
Backup youtube link
---------------------------------------------------------------
DOODLE BOOTH PHOTO BOOTH
Backup youtube link
---------------------------------------------------------------
FUNSTOP PHOTO BOOTH: PROGRAMMING SET UP
PART 1
Backup youtube link
---------------------------------------------------------------
FUNSTOP PHOTO BOOTH: PROGRAMMING SET UP
PART 2
Backup youtube link
---------------------------------------------------------------
FUNSTOP PHOTO BOOTH: RECONFIRM SAVE FEATURE
Attendant must always reconfirm both cameras are saving the clients photos
Backup youtube link
---------------------------------------------------------------
FUNSTOP PHOTO BOOTH:
Changing paper/ink & fixing "Printer: no paper" red warning screen
Backup youtube link
---------------------------------------------------------------
FUNSTOP PHOTO BOOTH:
How to unfreeze the start up screen (pc laptop required)
Borrow laptop from DJ, Photographer, Caterer or locations office, or anyone!
Backup youtube link
---------------------------------------------------------------
BACKDROP SUPPORT FRAME Type 1
Backup youtube link
---------------------------------------------------------------
FUNSTOP PHOTO BOOTH
&
SNAPSHOT PHOTO BOOTH
CHANGING PAPER & INK
Always change BOTH the ink ribbon and the paper at the same time!
Backup youtube link
---------------------------------------------------------------
FLIPBOOK DRUM UNIT or BELT RESET
The flipbook printer we use is the Brother HL4150CDN Color Laser Printer.
If you get the "replace drum unit" message replace the drum unit if you have one, but if you do not then you can manually reset the drum unit. To get to the reset menu that will let you reset the drum count, hit the stop/exit button. Then the number 3 and 9 at the same time. This also gets you to the belt reset.
OR
HL-4150CDN Drum reset instructions:
A. With the printer in 'Ready' status, press the GO and UP ARROW key at the same time.
B. 'Reset Parts Life' will appear on the LCD. Press the UP OR DOWN ARROW key to select Drum Unit. Press OK.
C. Press the UP ARROW key to reset the drum unit counter. Display will show 'Accepted' and the machine will return to 'Ready'.
---------------------------------------------------------------
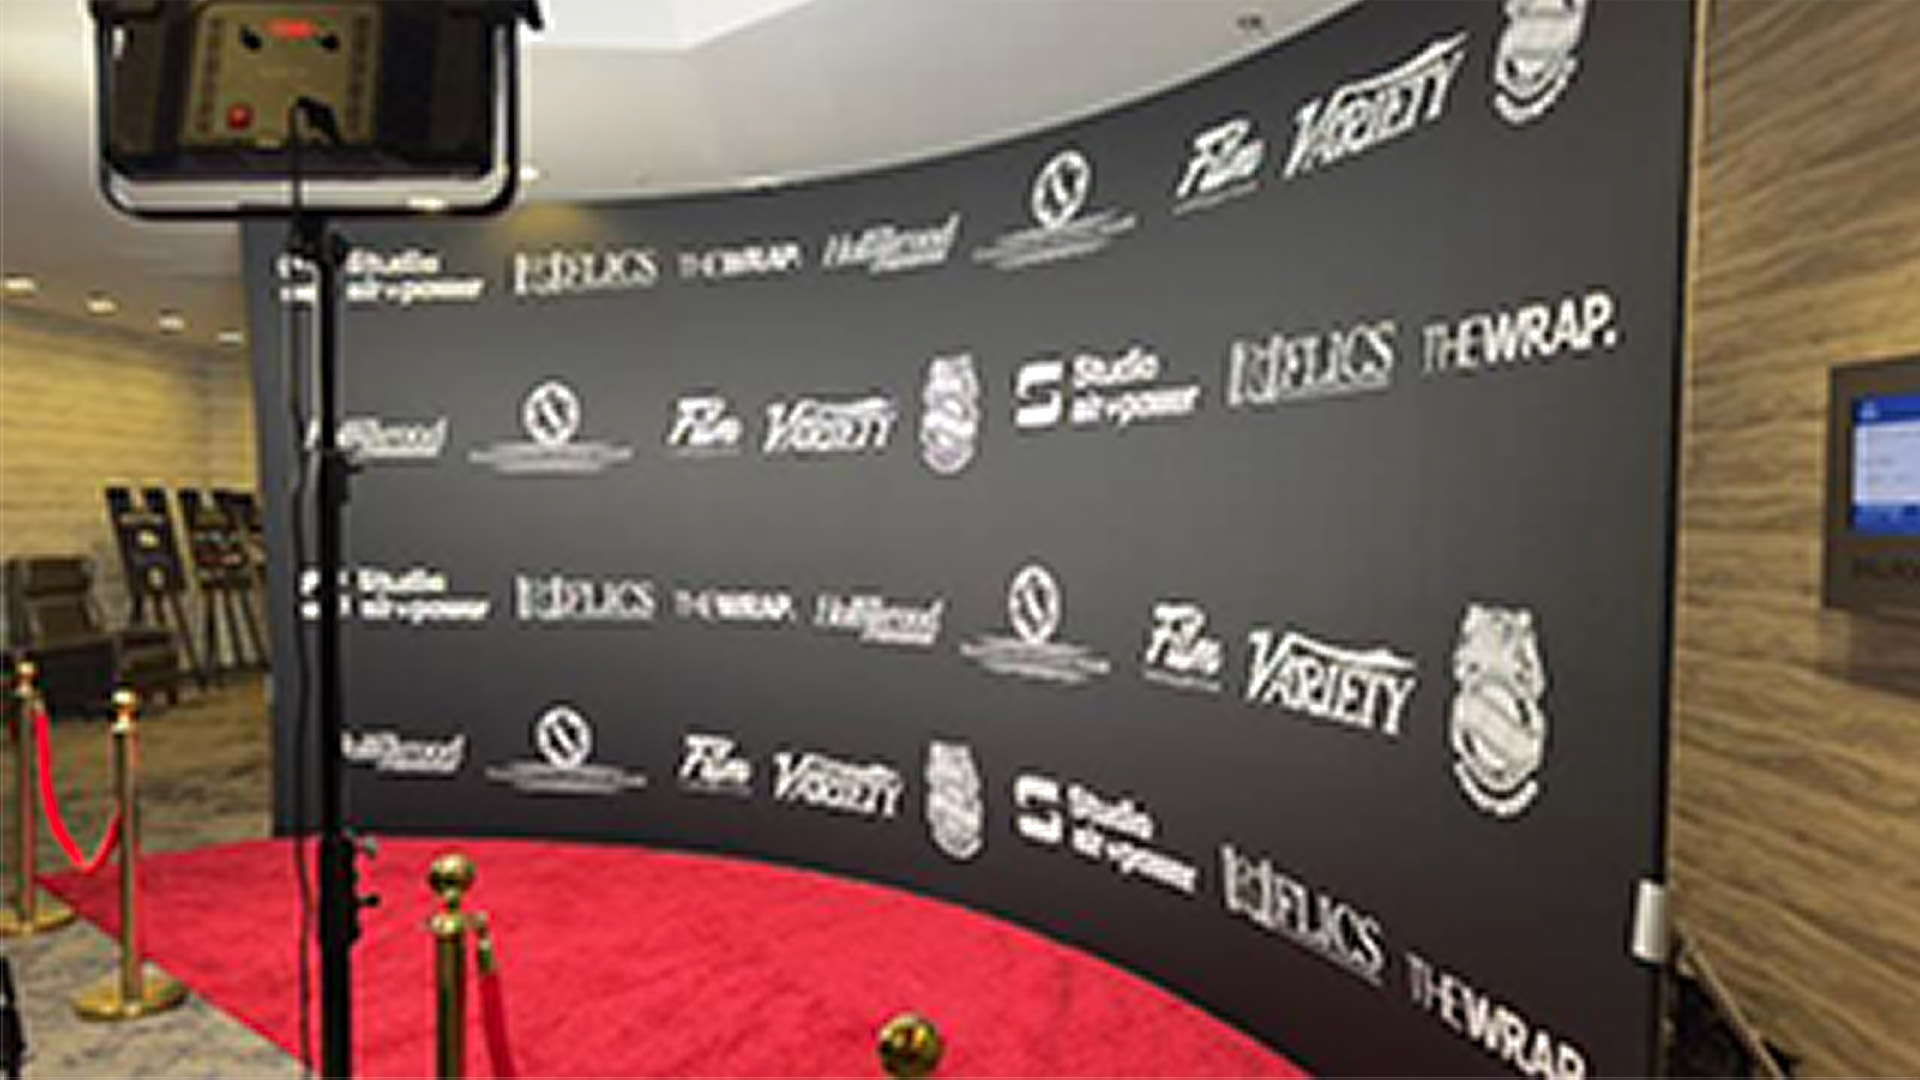
Your Glambot BACKDROP should always be set up Professionally. CLICK HERE
The red carpets should fill in the floor area of your backdrop. Below are 2 examples of how it should look.
1) Red Carpet fills in the floor perfectly
or
2) Red Carpet fills in floor and extends in front of the backdrop
Backup youtube link (SET UP + CALIBRATION)
Backup website link (Text Instructions for iPad + iPhone instructions
1. Watch Set Up & Calibration Video
2. Set Up Instructions: Read below for text version
There are 5 main pieces of equipment for the Glambot Booth; Glambot arm, GoPro, Glambot iPhone, Staff iPad, and (2) Guest iPads.
NEVER try to forcefully move the glambot arm.
1. Set up Glambot and go thru Glambot calibration set up, when Glambot is powered on it gives off it’s own WiFi signal called, “Glambot”.
CALIBRATION: The 1st time you calibrate the Glambot arm we recommend you watch the video 1st by clicking here. A brief surmize of the video is as soon as you power on Glambot watch the small hand/ wrist section on the end that holds the GoPro. As soon as you see it move, hold the main arm up slightly so you are holding it apx 1/4 inch higher than it rests. As soon as hand/ wrist stops, the next section of arm will engage the arm you are holding and the next section of the arm will start moving. When next section of arm starts moving you can let go now and wait for calibration to finish. It will go up/down/left and then stop. Glambot is ready.
CAUTION: If the arm never starts moving then turn it off, wait 5 seconds, power on again. Calibration will always fail if you're not holding the arm when hand/ wrist stops.
2a. After Glambot hardware is ready, set up the ipad you are using to run the glambot directly behind the Glambot and mount the iphone to the iPad using the black clamp attached to the phone holder. Make sure the iPhone is mounted in the holder directly on top of a wireless, magnetic charger so the iPhone and attached GoPro stay charged.
2b. Connect your iPhone WiFi to your mobile hotspot or the venues wifi. (not the glambot wifi) Connect USB C cable from iPhone to USB C port located underside/ middle of glambot arm, then connect 2nd usb c cable from GoPro camera to USB C port located near the end of glambot arm. Note: They don’t plug into each other directly. There are USB ports built into the glambot.
3a. Power on the GoPro by pressing in power button for 3 seconds. The screen shd say “USB CONNECTED”. If not, disconnect usb from iPhone and reconnect it.
3b. On the Glambot iPhone, launch the GoPro Quik App so the iPhone is connected to the GoPro.
4. In iPhone settings go to Bluetooth and connect to “Glambot” bluetooth.
REMEMBER: You’re connecting iPhones internal bluetooth to the Glambot bluetooth signal, not the GoPro signal.
5a. Launch Snappic App on iPhone.
If it doesn’t log you in automatically you need to log in:
For White Label event: USER: mclain@pixsterphotobooth.com PASSWORD: Eye4details!
For Cocktail Hour Entertainment event: USER: sales@cocktailhourentertainment.com PASSWORD: Stargate123!
5b. At the very top of snappic make sure “Live” tab is selected.
Click on your event, Example, “Glambot 10-26-24”.
Scroll down to “Select Accessories”, and select “Volume” so it is high lighted, then select “Done” in top right corner.
Click “Configure Camera”, then at bottom click “Search For GoPro Camera”, select “Hero12 Black Wired”. It must say wired. Note: Do not select the wireless GoPro if it appears here.
5c. Select, “Start Photo Booth”/ Select your phone (if it asks you to name it, give it a name), If a pop up asks to enable GoPro support, select, NO.
TROUBLE SHOOTING: If it keeps asking you to name your phone and doesn't accept the name you prob have no wifi signal. If problem persists just delete snappic app and reinstall it.
5d. Press START BOOTH, At the bottom of screen press VIDEO, at the bottom of the screen choose one of the video templates, then press the arrow > button in the top right corner. The screen will now say ’TAP TO START”. You are now finished with the iPhone. Note: if you need to EXIT the current session at any time press the button in the top left corner until it says EXIT. Then enter the password 1234. This password prevent guests from exiting the session.
GUEST IPADS: Connect the guest iPads to your mobile hotspot wifi or venue wifi (The same as the glambot iPhone). On the iPads repeat step 5a above and launch Snappic app and select your event, but instead of selecting START BOOTH you will select START GALLERY. Repeat this for both guest kiosks. Guests will use these kiosks to access and text/ email their videos.
TROUBLE SHOOTING TIP: If connection is weak and kiosk is not downloading the latest videos you can let guest use the glambot iPhone and click "Gallery" to scroll thru the guest videos and let clients text their videos directly from the iPhone.
GLAMBOT ATTENDANT IPAD: Turn on your employee iPad which will be set up directly behind the Glambot. Go to iPad settings/ Wi-Fi/ and select Glambot-0039 wifi channel. PASSWORD: Glambot1
Open safari web browser, enter http://glambot-0039.local:8080/webapp
You are now in the Glambot Webapp which is the screen used to run the Glambot arm. Click Here to see how to use the App
TROUBLE SHOOTING TIP: If arm is not responsive try refreshing the web browser and make sure this ipad is connected to Glambot wifi.
6. During event for each guest session, follow instructions 5d. above until it says, ’TAP TO START”. (Don't tap to start)
In the glambot App choose one of the “Paths”, then press green “Start” button. The arm will move to the start position and wait 3, 5, or 10s based on your settings. When this delay ends the Glambot will start its path and the GoPro will automatically start recording and stop recording when the arm stops moving. It will edit the video and show it on your phone for you to view AND it will appear on the customer Kiosks, where guests select to text or email it.
7. After each session ends you can start the next session immediately from where the arm stopped, or you can press the “home” button in the employee IPAD app to move the arm out of the the way for the next guests to enter the filming area. ALWAYS MAKE SURE THE GLAMBOT AREA IS CLEAR OF GUESTS BEFORE YOU PRESS THE "HOME" OR "START" BUTTON. Press the red "STOP" button on the Employee Ipad to stop the glambot without shutting power to the glambot. There is an emergency STOP button on the floor, but this button kills power to the unit so you will need 5-10 minutes to reset the arm using the included 24V power supply to unlock the arm and then recalibrate it.
8. When the event ends, press the “OFF / Extend” button which moves the arm into a movable position so you can disassemble it. If you don't do this you wont be able to bend the arm to fit it in the roadcase. Speak to Eric before you power down the Glambot if you do not know how.
REMINDER: Glambot iPhone will be mounted on top of a wireless charger. This mount will be attached to the iPad. NOTE: This keeps the iPhone charged and the iPhone (Via USB-c cable) keeps the GoPro charged.
TROUBLE SHOOTING
STUCK ARM: Glambot arm is stuck and won’t move: 1. Make sure no one is near the Glambot paths, 2. One employee gets ready to catch the arm from dropping, second employee connects 24V power supply directly to 2 pin arm wire using the color-coded cable. As soon as you power this on the glam but arm will drop. 3. Move arm to the neutral calibration location. (Big Arm parallel to floor, small arm 90º angle facing floor.) 2. Unplug the 24V power supply to re-lock arm. Power down the Glambot, wait 5 seconds, power on Glambot and follow calibration procedure watching the camera arm and as soon as you see it move, hold the arm up so you are holding it apx 1/4 inch higher than it rests. As soon as the next section of arm starts moving you can let go and wait for calibration to finish.
CONNECTING A GoPro USING SNAPPIC
EVENT WONT LOAD IN SNAPPIC: the wifi is not connecting. Check your wifi, if it is good, Delete the App and reinstall it if all else fails. Note: when you install the app; 1) open it, 2) quit, 3) open a 2nd time and sign in with email and password. If you don't quit the first time, it won't accept the username and password.
For more solutions for this software CLICK HERE
---------------------------------------------------------------
1. Preview Screen not working:
Click Here or read below
Description
Customer preview window does not seem to function properly, e.g. crashing, not appearing, etc.
Solution
Option 1: Ensure the Customer Preview Window is set to appear
Open dropoutGS
Click on Settings > POS (Professional) / Second Monitor (Express) > check Show customer preview window
Click Main
Customer preview window should appear over all other windows
If you do not see the Customer Preview Window, check to see if it is appearing on other monitors
Option 2: Reset the Customer Preview Window
Exit dropoutGS
Open Windows Explorer and locate C:\Users\[UserName]\AppData\Local
Note: [UserName] refers to the computer account under which dropoutGS was installed. If uncertain, contact your systems administrator or local IT staff for assistance.
Within C:\Users\[UserName]\AppData\Local, delete GreenScreenPreview folder (right-click on folder, select Delete; or highlight and press DEL on keyboard)
Once deleted, restart dropoutGS
If the settings in Option 1 above have been enabled, the Customer Preview Window should now appear.
For more solutions for this software CLICK HERE
---------------------------------------------------------------
GREENSCREEN LAPTOP USING PPU (Photo Party Upload)
Click Here for youtube video
if your using the green screen on a laptop and you want to use some tablets/ipads as kiosks so guests can text and email their photos from those kiosks this video shows you how using PPU (Photo party Upload) which must be set up in the laptop. This video assumes the programs are already loaded, but if you need to install them then follow the instructions below.
Install Instructions:
1. log in to LA photo partys website with our username and password;
EMAIL: sales@cocktailhourentertainment.com
PASSWORD: s...3 (call luis or eric)
2. download and install both PPU and PPU helper on the laptop.
3. make sure PPU helper is set to autostart and make sure it is running.
4. In the bottom right corner of the screen click on the taskbar and right click the small PPU icon that looks like a green camera.
5. Click on "sign in" and you will be prompted to enter your email and password (same as above).
6. After the website confirms you are signed in repeat step 4 above and the click on "Events" and select "Refresh" to download all of the events.
7. Then repeat step 4 again and right click on "Events" and make sure your event is selected with a check mark next to it.
8. Find out which folder in the laptop is where the photos are being saved and then go back to step 4 above and select "Chose watched folder" and select that folder.
9. Now you can finish by watching the video above.
---------------------------------------------------------------
LA PHOTO PARTY PPU TROUBLE SHOOTING
MANUALLY CONNECT PPU HELPER:
Open the Command Prompt App (or click "Start" button in bottom corner and enter "Command Prompt" in search bar.
Select it from the list when it appears. (Note: If you right-click Command Prompt and select Run as administrator or click it in the results, you'll open an elevated Command Prompt which is the same but better.
Once Command prompt/shell
is running type "ipconfig" and it will tell you the computers IP address. The enter it into the sharing stations as the manual helper address. NOTE: Make sure firewalls are off and network is private, not public.
Command Shell
Use ipconfig on command shell on booth to find IP address.
Then input that into sharing station. Make sure firewalls are off and network is private, not public.
---------------------------------------------------------------
Click this link to watch Youtube video showing how to handle the LED Lights for the House of Mirrors.
NEVER bend the lights more than 90 degress or you'll break them.
Backup youtube link
---------------------------------------------------------------
ID CARD PRINTER & SOFTWARE
CLICK HERE FOR YOUTUBE VIDEO
https://youtu.be/zT527sPTnYE
---------------------------------------------------------------
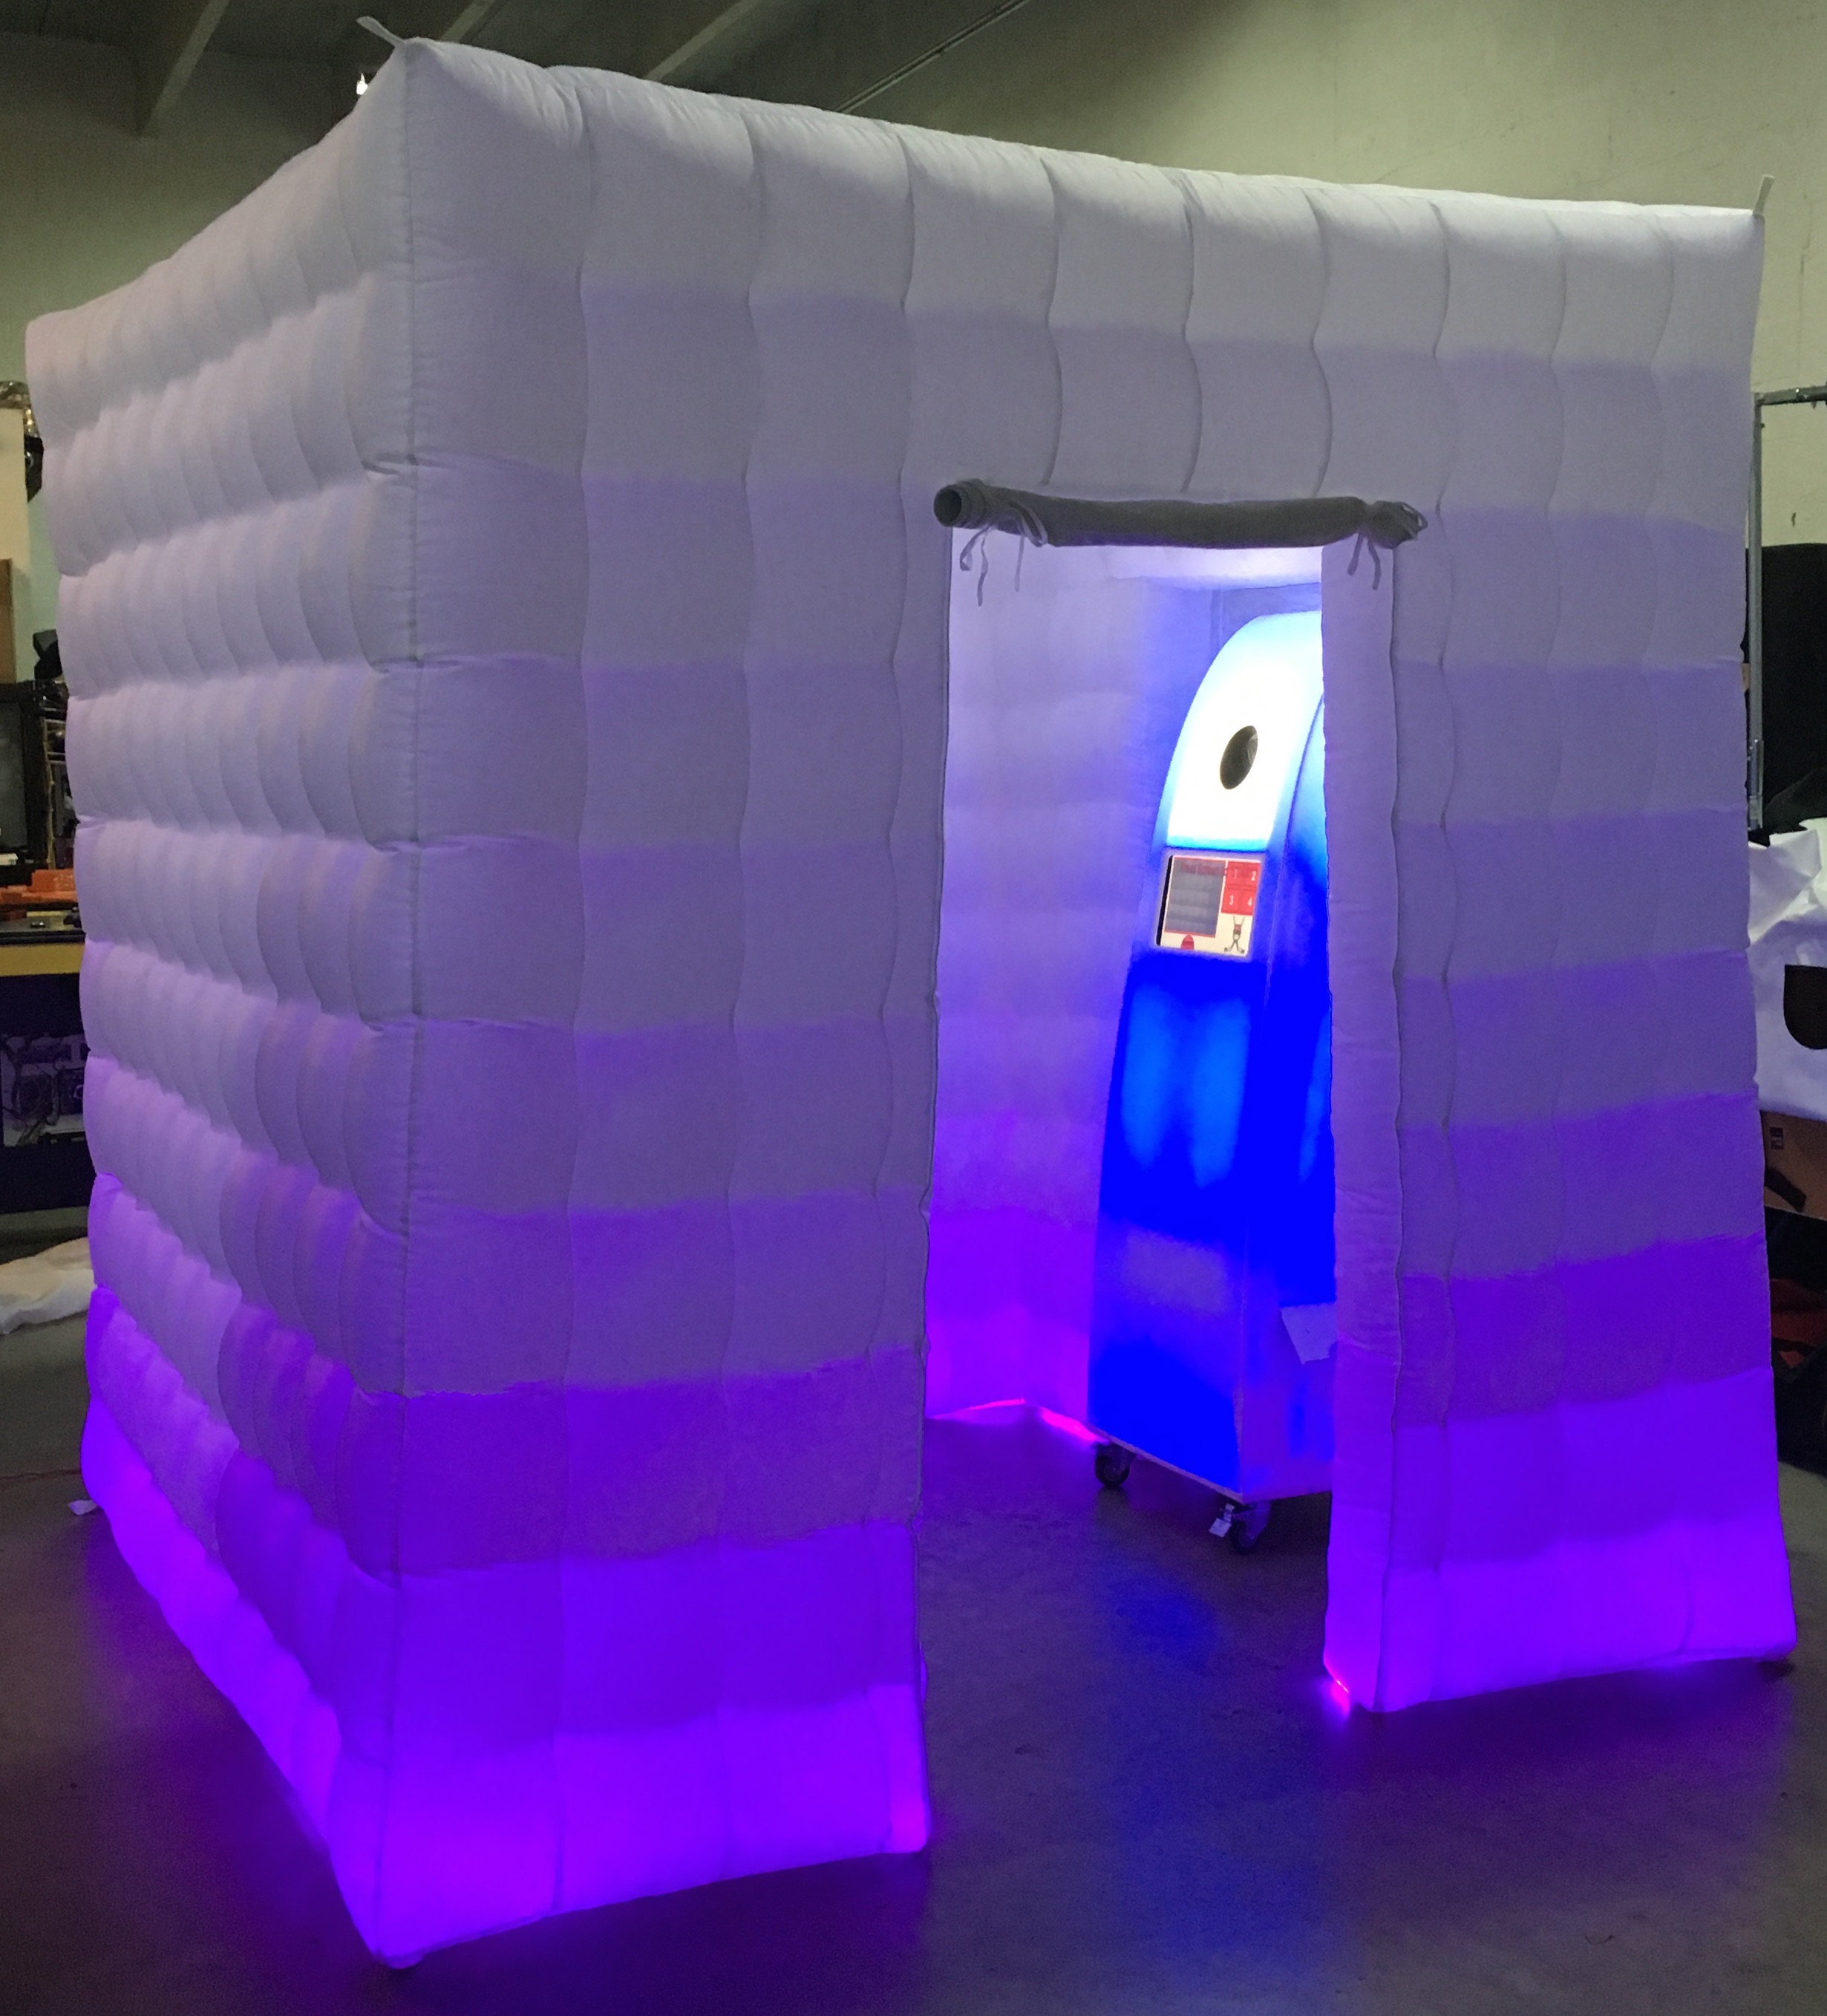
INFLATABLE PHOTO BOOTH ENCLOSURE
SET UP & STRIKE
Backup youtube link
On some of the legs you can unzip them to let the air out more quickly when wrapping the enclosure up.
Make sure when you finished you wrap the enclosure inside the white bag.
Important: When setting up the enclosure make sure the unit is not inside out by making sure the black fan is on the outside. This side of the enclosure that has the fan should face the wall so guests cannot see it. Make sure you have at least 12" b/n the wall and the fan otherwise the fan will suck up anything nearby like a curtain. Then it will jam and deflate.
Also, make sure there are no Zippers on the legs left open or the unit will not inflate properly. Always put the power cord and remote control in the red bag.
---------------------------------------------------------------
INFLATABLE VOGUE BOOTH
CLICK HERE FOR YOUTUBE VIDEO
---------------------------------------------------------------
INSTACAM SET UP GUIDE
trouble shooting tips are listed below
Instacam Photo Booth Set Up Part 1
Backup youtube link
Instacam Photo Booth Set Up Part 2
Backup youtube link
INSTACAM COMPUTER SET UP
Instacam Photo Booth Set Up Part 3
(read below video if you are having trouble with the printer or webcam)
Backup youtube link
If printer will not print follow these steps:
1. Make sure printer is powered on (green light on front of printer)
2. If the printer is powered on and any other lights are on this indicates
an error with the printer and you must open the printer and check the
Ribbon & Paper (scroll down to next video)
3. Make sure the printers USB cable is securely connected to the
back of printer and the other end is connected to the correct USB
port on the computer. (USB Port is labeled "printer")
4. Restart the computer (not shutdown, RESTART) with cables still connected.
5. Go to the desktop screen and touch/swipe up from the bottom
of the screen to pull up the small icons across the bottom and
click the Control Panel icon (below in Figure A).
In the Control Panel settings click on "View devices & printers" (Fig B).
Then make sure the RX-1 printer is "set as default printer" (Fig C).
To do this left click the RX-1 printer to select it,
then (after you select it) "right" click the RX-1 printer to bring up the menu
in Fig C. Now scroll down to "select as default printer" and left click it to
select it (this will put a check mark next to it) so now it is the defult printer.
6. The last step to fix a stopped printer is to delete all print jobs
from the queue of all of the printers. We need to cancel all the other
print jobs from all the other printers in case the computer is trying to
print something before it prints from the RX-1.
For each of the other printers, left click on each printer icon (Fig C)
to select that printer, then right click that printer to bring up the same menu
in Fig C and click "see what's printing", this will bring up Figure D.
If there are no documents listed skip to the next printer.
If there are any documents listed click "cancel all Documents"
to delete them which will cancel those print job(s).
There may be a delay before the documents are canceled
or you may need to open and close this menu once or twice
before the document(s) disappear from the list.
Once you confirm all the printers are not trying to print anything
start the photo booth program up and do a test print.
Figure A
![]()
Figure B

Figure C

Figure D
If the Webcam is not working correctly or stops working:
1. Unplug the webcam from the USB port in the computer and plug it back in.
2. In the photo booth program go to the General tab
(Figure E)
and make sure webcam is selected then click on the grey icon
to see your choice of webcams (Figure E). By default the
program sometimes reverts to using the built in webcam 2.0,
we don't want this webcam b/c the resolution is too small which
makes the images too small. When you click on the grey icon to
select webcam you should have 2 choices; USB 2.0 or Logitech camera)
chose the Logitech camera. If you don't see it listed then unplug
the webcam and plug it back in, then quit the photo booth program
and then restart the photo booth program.
When you see the logitech camera in the choices click it and
another menu will come up for the logitech camera settings,
only change the 1 setting for the highest resolution available
which will provide better quality photos. (ex. 1920x1200)
After you select the correct webcam you still may have
to repeat this step 1x or 2x in a row before it saves it.
That should be it, every problem we've ever had
with the webcam was fixed with these steps.
Do not change any other settings without checking with Eric.
Figure E

Instacam Photo Booth Changing
Paper & Ink Ribbon
This video shows the same printer (DNP RX1) being changed in the Superbooth.
The process is exactly the same except the first 52 seconds is only for the Superbooth and Selfie Mirror, so you can skip that for the Instacam.
Always change BOTH the ink ribbon and the paper at the same time!
Backup youtube link
---------------------------------------------------------------
Brava 21 Sticker Printer
Changing Sticker Paper & Ink Ribbon
How to change the Paper/Ink for Instacam (Brava 21 Sticker Printer)
Always change BOTH the ink ribbon and the paper at the same time!
Backup youtube link
---------------------------------------------------------------
IPHONE PHOTO BOOTH SET UP
This is a detailed video showing how to set up the software and camera settings
CLICK HERE FOR YOUTUBE VIDEO
https://youtu.be/PA7g7GuqpQw
IPHONE PHOTO BOOTH -DISABLE SETTINGS MENU
REMEMBER TO DISABLE THE SETTINGS BUTTON SO GUESTS CAN'T ACCESS SETTINGS MENU
CLICK HERE FOR YOUTUBE VIDEO
https://youtu.be/hhptuI_pQW4
IPHONE PHOTO BOOTH -WIFI & VOLUME SETTINGS
CLICK HERE FOR YOUTUBE VIDEO
https://youtu.be/zumcUV2j8Tw4
IPHONE PHOTO BOOTH -CAMERA ANGLE & LIGHT ADJUSTMENTS
CLICK HERE FOR YOUTUBE VIDEO
https://youtu.be/2tIx8UHCWIs
IPHONE PHOTO BOOTH -ACCESSING THE PRINTER
CLICK HERE FOR YOUTUBE VIDEO
https://youtu.be/mX7gWt6R3U0
CHANGING THE PAPER & RIBBON
CLICK HERE FOR YOUTUBE VIDEO
https://youtu.be/pfMJlFn3lvE
This video shows the same printer (DNP RX1) being changed in the Superbooth.
The process is exactly the same except the first 52 seconds is only for the Superbooth so skip that.
Always change BOTH the ink ribbon and the paper at the same time!
Backup youtube link
IPHONE PHOTO BOOTH -SHUT DOWN PROCEDURE
CLICK HERE FOR YOUTUBE VIDEO
https://youtu.be/nS0x-TPnLaY
---------------------------------------------------------------
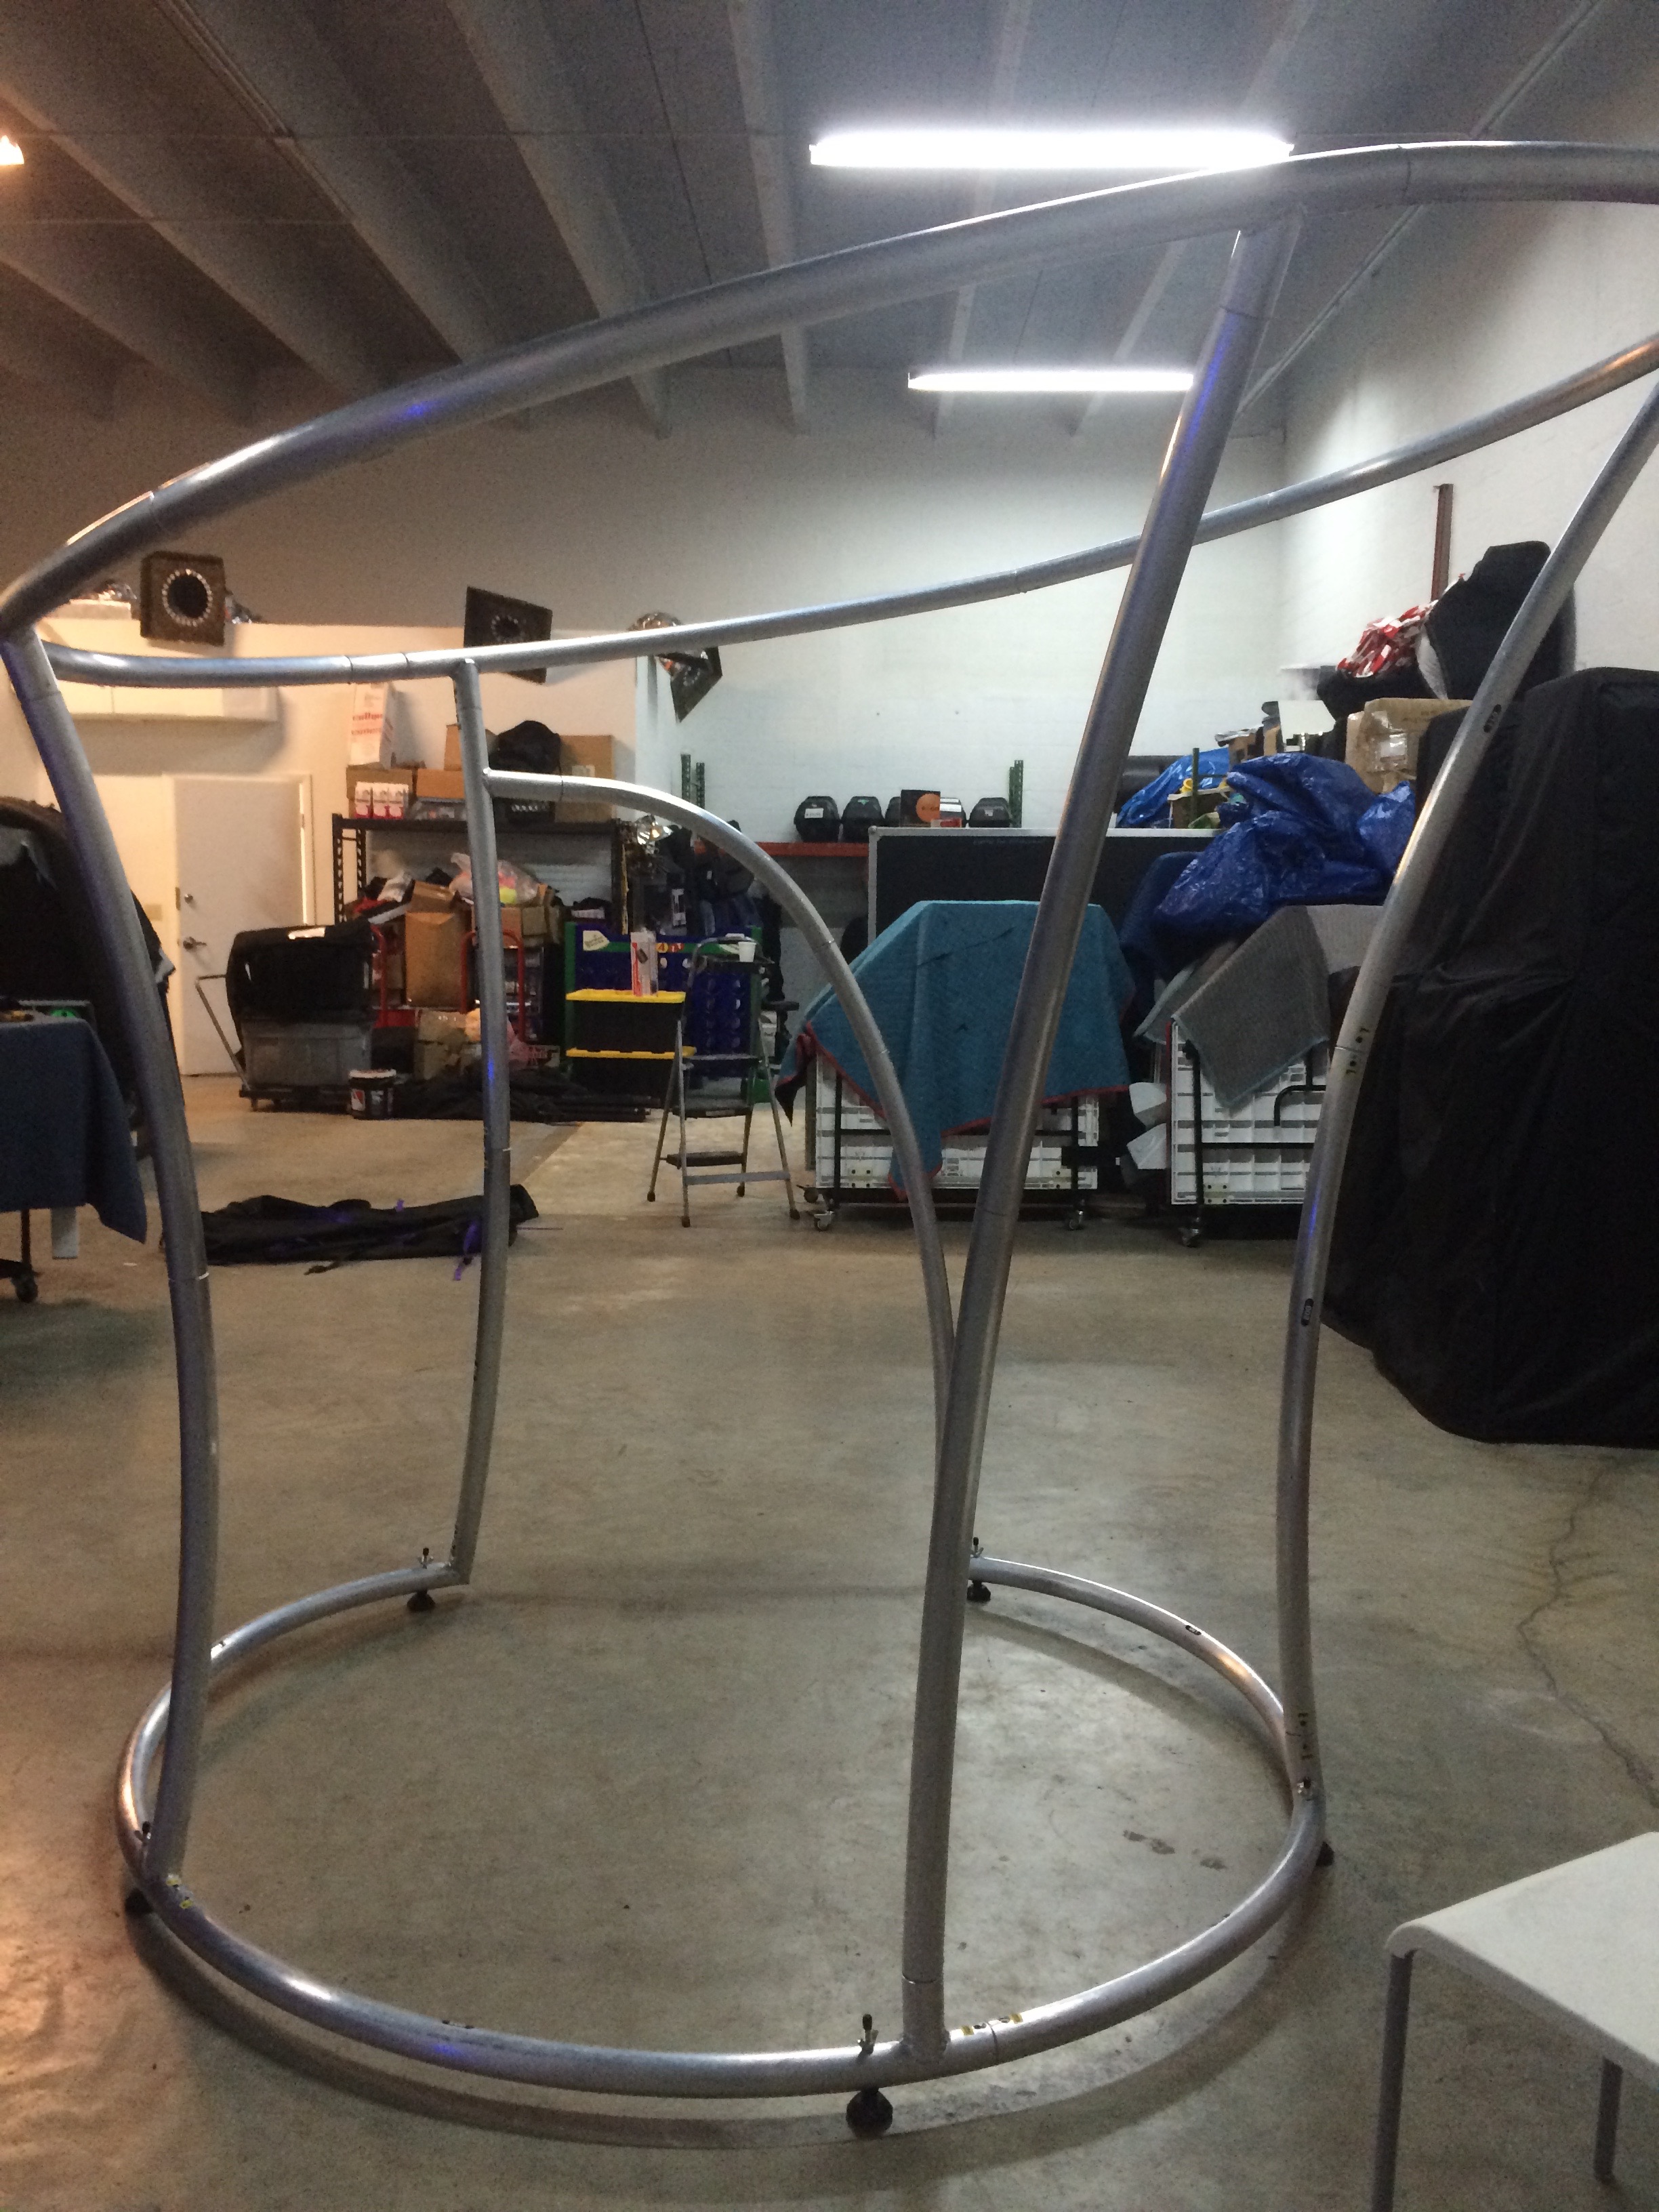
ROUND SPANDEX PHOTO
BOOTH ENCLOSURE
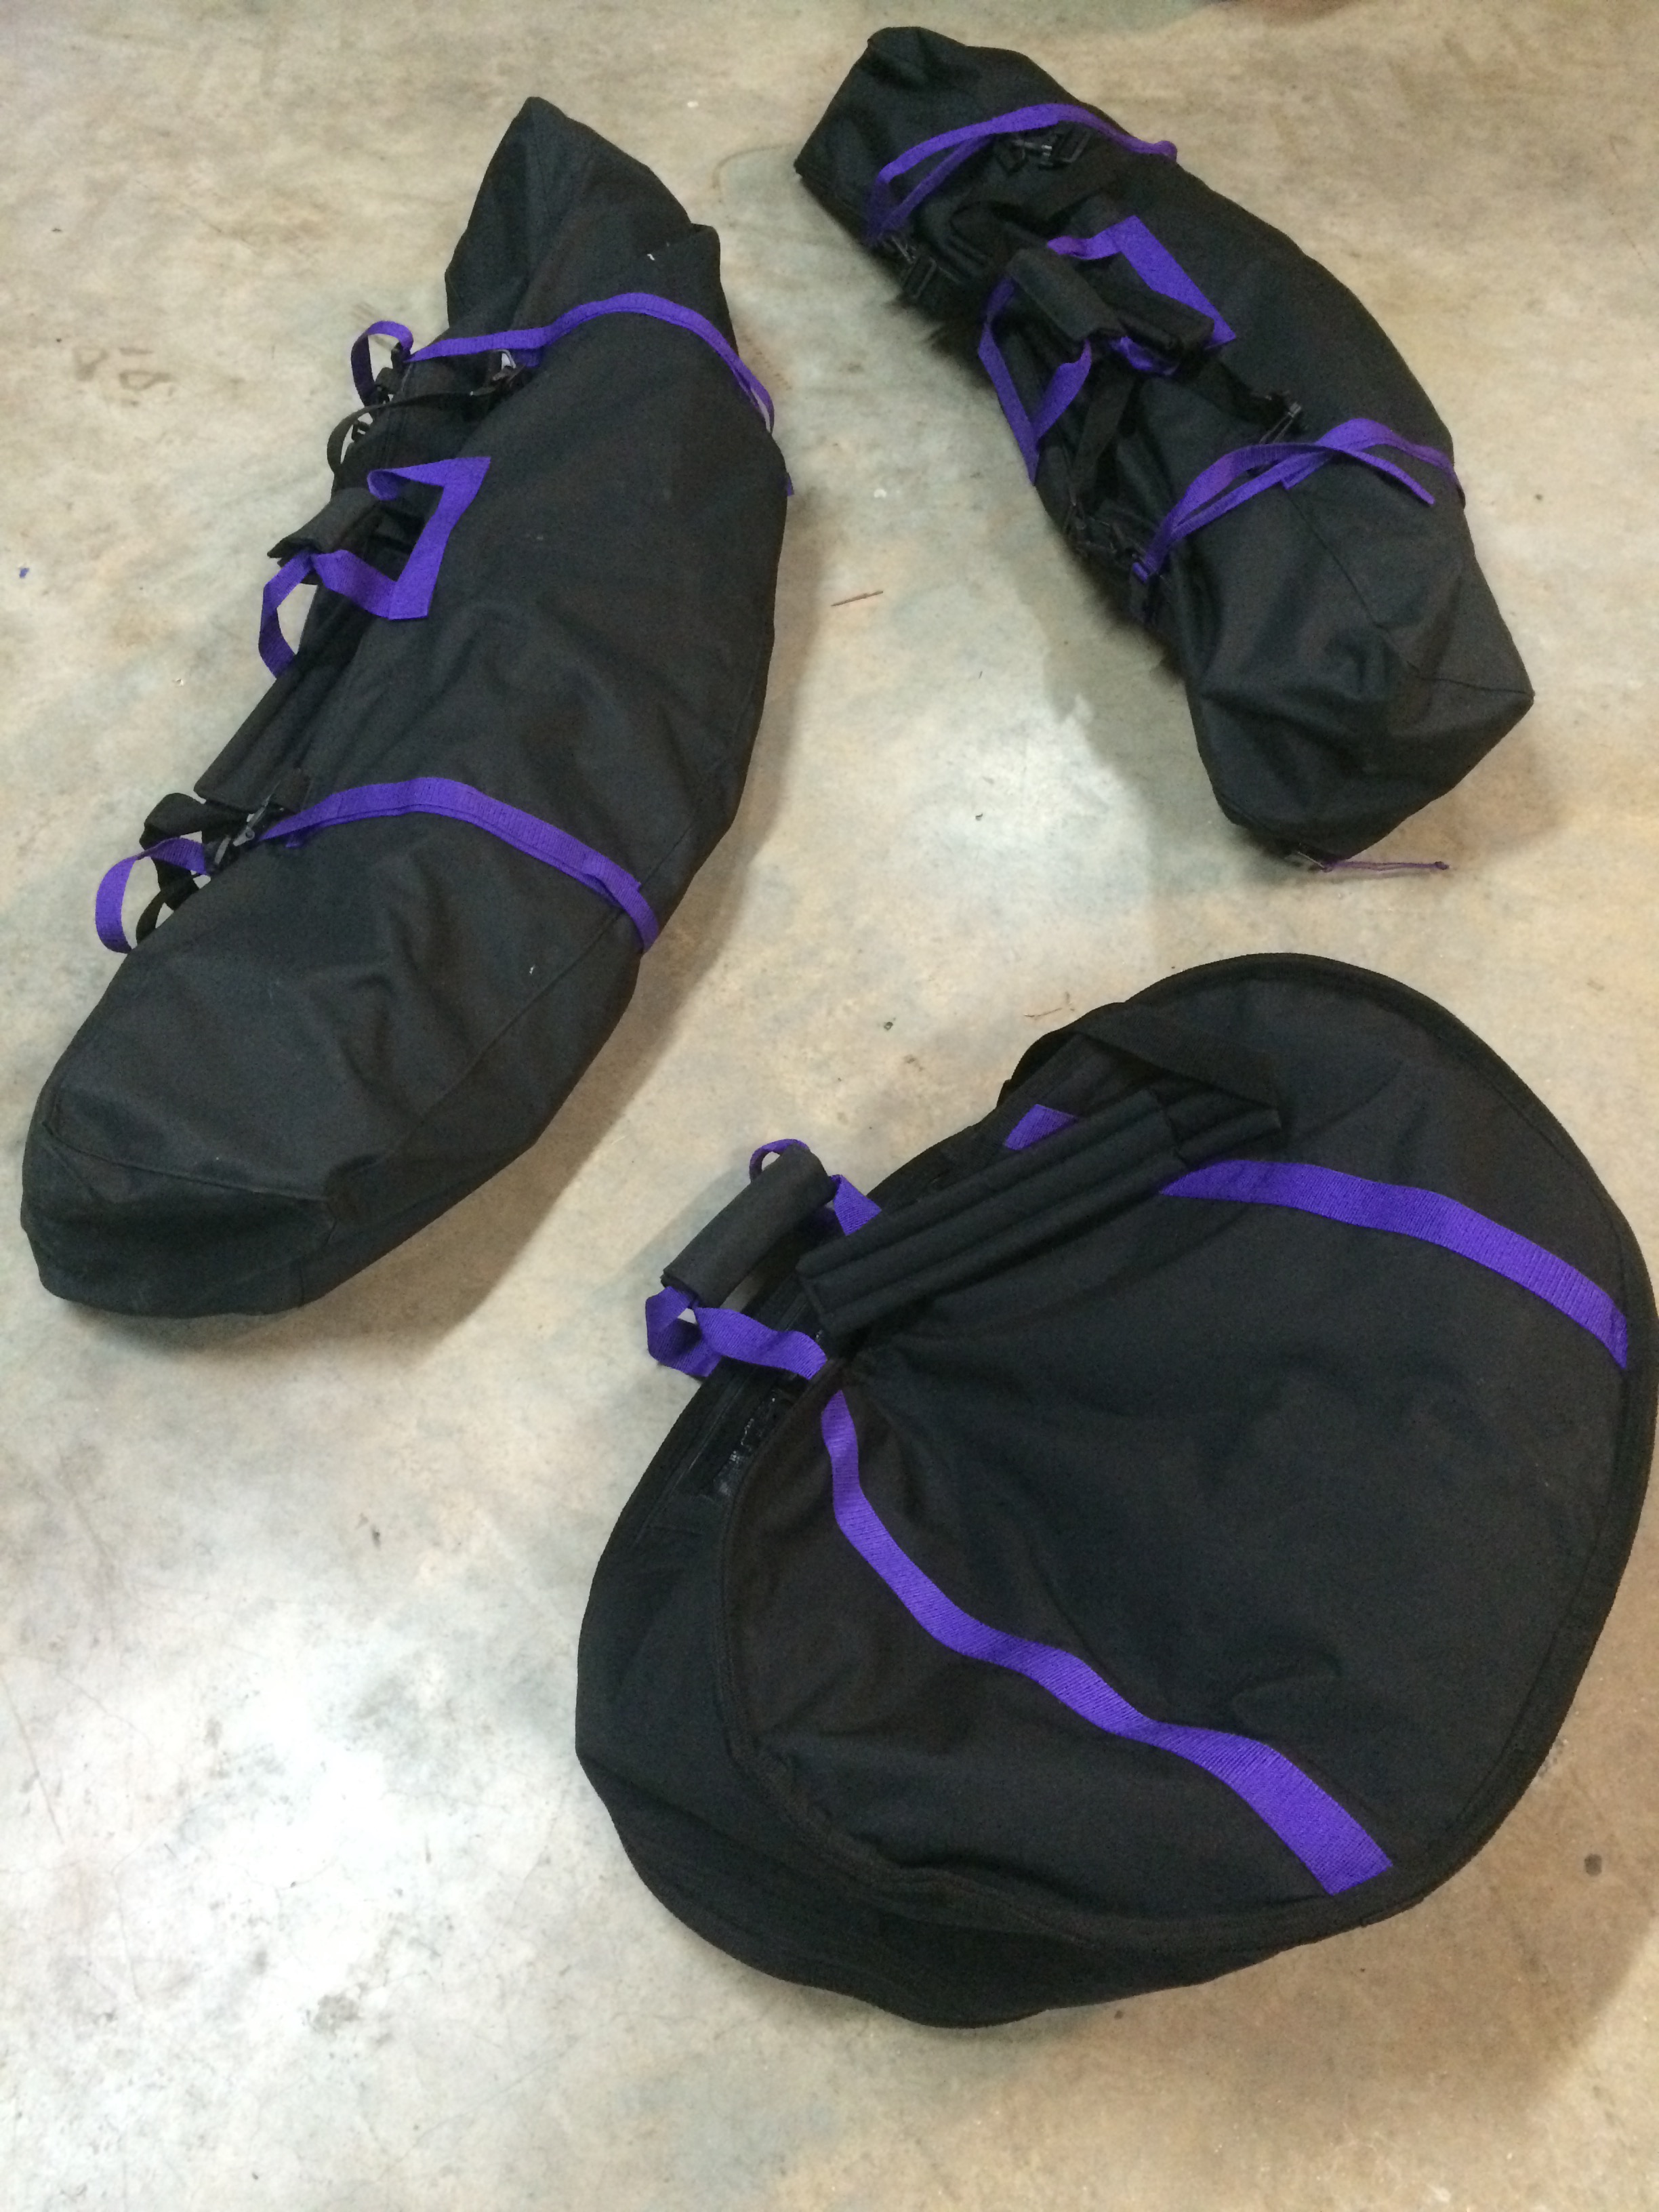
EQUIPMENT: 3 BAGS
Carefully remove all pieces to assemble, note the larger pieces fit
in the larger bag. DO NOT RUSH TO PUT AWAY AND RIP THE BAG!
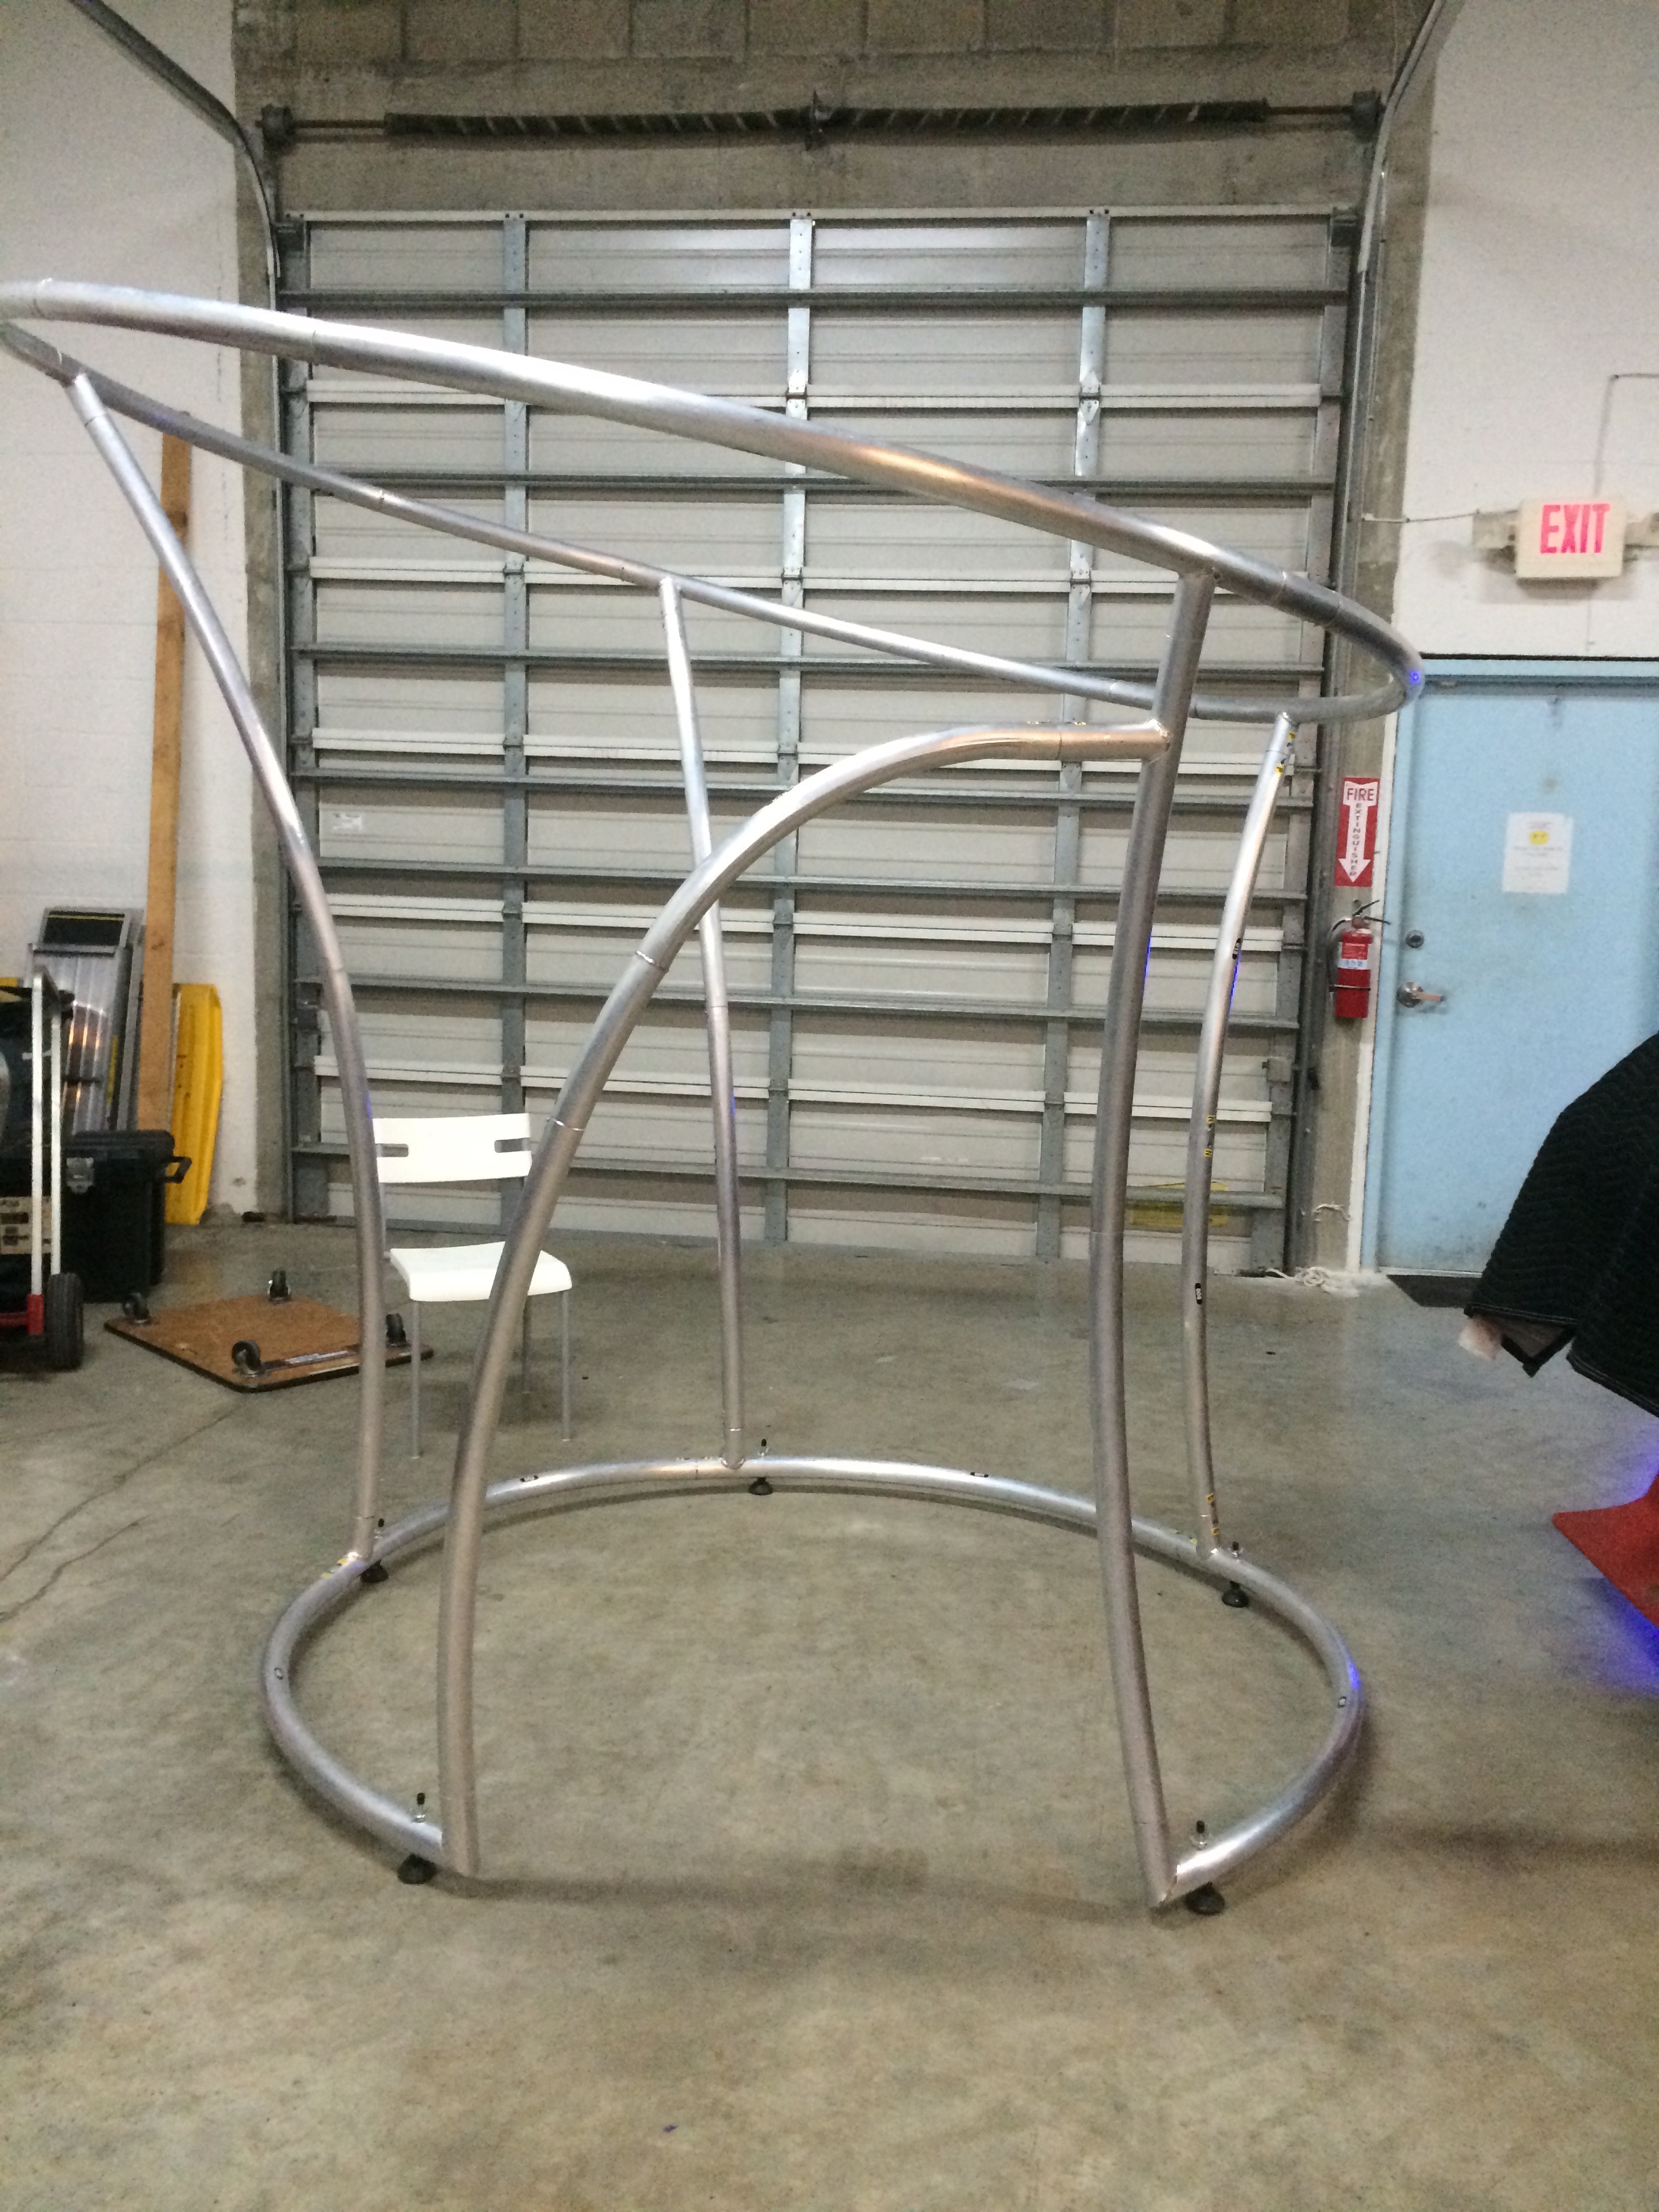
Completed Metal Frame before spandex cloth added.
Spandex Enclosure Frame Video Tutorial Part 1
Backup youtube link
Spandex Enclosure Frame Video Tutorial Part 2
Backup youtube link
---------------------------------------------------------------
SPANDEX ENCLOSURE
FABIC WRAP
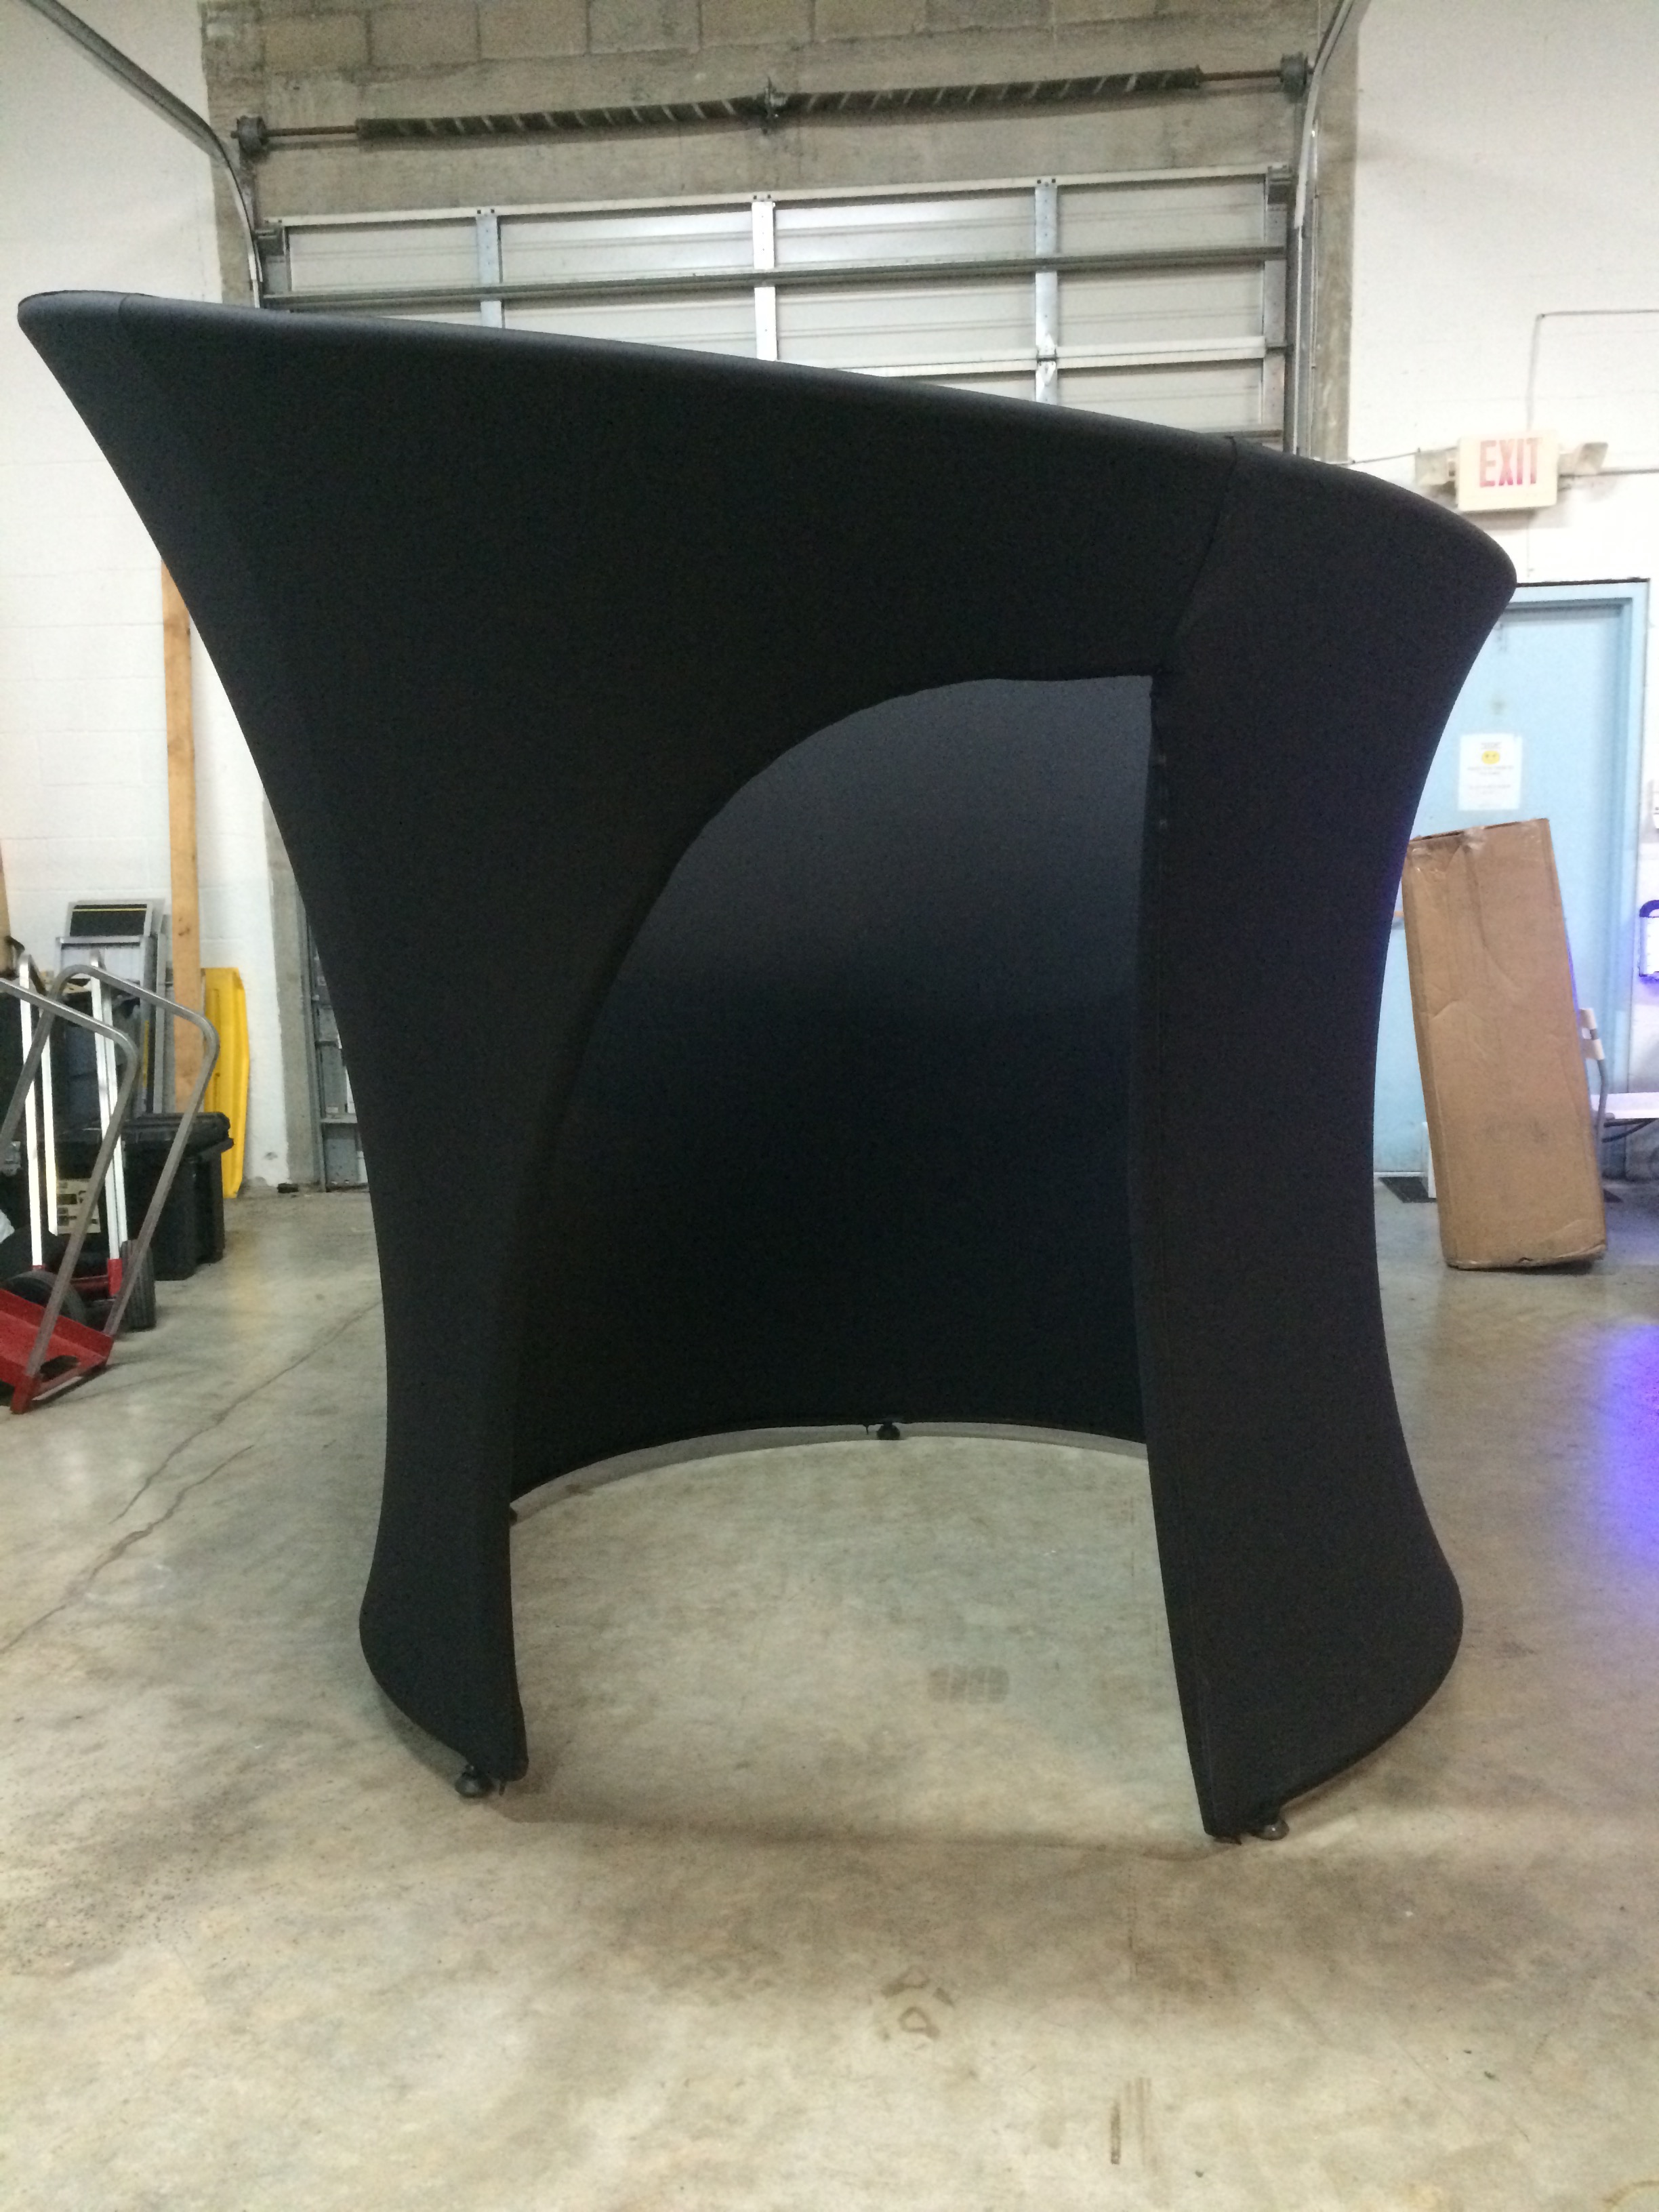
Spandex Enclosure Fabric Wrap Video Tutorial Part 1
Backup youtube link
Spandex Enclosure Fabric Wrap Video Tutorial Part 2
Backup youtube link
Spandex Enclosure Fabric Wrap Video Tutorial Part 3
Backup youtube link
Spandex Enclosure Fabric Wrap Video Tutorial Part 4
Backup youtube link
Spandex Enclosure Fabric Wrap Video Tutorial Part 5
Backup youtube link
Spandex Enclosure Fabric Wrap Video Tutorial Part 6
Backup youtube link
Spandex Enclosure Fabric Wrap Video Tutorial Part 7
Backup youtube link
Spandex Enclosure Fabric Wrap Video Tutorial Part 8
Backup youtube link
---------------------------------------------------------------
LED Photo Booth Set Up & Strike
To change the color of the Photo Booth cue to 5:22
Backup youtube link
LED Photo Booth
Switching Design & Print outs
Backup youtube link
LED Photo Booth Changing Paper & Ink
Always change BOTH the paper and ink together. Discard old paper & ink.
You can skip 1st 30 seconds of video
Backup youtube link
LED Photo Booth
saving client photos to flash drive
This process can be used at the start of the party or at the end.
Backup youtube link
---------------------------------------------------------------
MIRROR ME PHOTO BOOTH PART 1
What's inside + External Flash Set Up
Backup youtube link
---------------------------------------------------------------
MIRROR ME PHOTO BOOTH PART 2
Setting up TV, Camera, Laptop Cables, printer, and Hanging Picture Frame
Backup youtube link
---------------------------------------------------------------
MIRROR ME PHOTO BOOTH PART 3
Computer Settings, Starting Photo Booth program, Camera Focus, Other settings, Test The Booth, Proper Shut down of Computer.
Backup youtube link
---------------------------------------------------------------
MIRROR ME PHOTO BOOTH PART 4
How to set up the color changing LED lights inside the picture frame
Backup youtube link
---------------------------------------------------------------
MIRROR ME PHOTO BOOTH -Changing paper/Ink
This video shows the same printer (DNP RX1) being changed in the Superbooth.
The process is exactly the same except the first 52 seconds is only for the Superbooth and Selfie Mirror, so you can skip that for the Mirror Me Booth.
Always change BOTH the ink ribbon and the paper at the same time!
Backup youtube link
COMMON MISTAKES:
Touch Screen Not Working
Q. After you finish setting up the photo booth the touch screen doesnt work?
A. Unplug the Red USB cable on the right side of the laptop then plug it back in. This resets the power for the touchscreen sensors.
Program Crashes When Taking a Photo
Q. Why does the program crash right when the photo booth is taking the a photo?
A. This is because you left the camera in AF (Autofocus), just Switch the camera to MF (Manual Focus) by pushing the switch on the side of the camera, then press "ALT" + "F4" simultaneously to force quit the program and then restart the Mirror Me program.
Note: when you force quit the program it may change the laptops orientation back to "landscape" mode so you would have to go back to the display settings and change the orientation back to "portrait flipped".
The program is crashing b/c when the camera is in AF mode (auto focus) it requires a certain amount of light to focus automatically so if the room is too dark or the backdoor of the photo booth is closed the camera cant focus properly on the subject and that crashes the program. You only use the AF the very first time in a bright room with the photo booth door open by getting a person to stand in the location where your guests will pose, then take 1 photo with the auto focus on so the camera adjusts the lens for you. Then you switch to MF (manual focus)to lock the focus. Just remember to tell all the guests to stand in the same basic location.
Q. The Photo Booth has no Sound
A. Use the remote and make sure the volume is on and it isn't on mute. Also make sure the volume on the laptop is turned on and not muted.
Q. Why did the program crash?
A. Check for loose cables. If any of the USB ports or the power cord for the laptop are disconnected while the program is running this can cause the program to crash.
Q. How do I adjust the angle of the camera or zoom the camera in or out?
A. On the bottom of the camera (right side) there is a toggle bolt bolted through the wood to hold the camera in place. Just loosen the bolt and adjust the camera up or down and retighten the bolt.
The camera lens has 2 parts; if you turn the very thin tip of the camera lens it will change the focus, but you shouldn't touch this if the camera is already focused. The larger part of the lens closer to the body of the camera can be turned to zoom in or out and this will not affect the focus. To fit more people in the photo zoom the camera out, to get more close ups just zoom the camera in.
You shouldnt have to change this unless the client requests it.
Q. Why is paper getting jammed?
A. Make sure the paper & ribbon are loaded correctly and the ribbon is tight, not loose.
Make sure the opening for the metal printer cover that sits over the printer lines up
with the part of the printer where the prints come out. If the metal cover stops the paper from feeding in/out during the printing cycle is will cause the paper to jam!
MIRROR ME PHOTO BOOTH -Changing The template/Logo
This video shows how to change the design that you will see on the photosprint outs which are customized for every party. These designs are premade and loaded in the laptop for you. The design you are loading will always be saved on the desktop of the computer and the name of the file will always contain the date of the event. Ex. 6-5-16
Backup youtube link (new detailed demo)
Backup youtube link (old short demo)
---------------------------------------------------------------
PHOTO SHOOT PHOTO BOOTH
Set Up Photo Booth
Backup youtube link
---------------------------------------------------------------
PICBOX PHOTO BOOTH
Backup youtube link
---------------------------------------------------------------
RETRO PHOTO BOOTH SET UP & STRIKE
Backup youtube link
---------------------------------------------------------------
RING ROAMER SET UP (Blue Tooth)
Backup youtube link
---------------------------------------------------------------
RING ROAMER SET UP (DSLR)
Backup youtube link
---------------------------------------------------------------
SALSA PHOTO BOOTH SET UP
Backup youtube link
SALSA PHOTO BOOTH SOFTWARE
Backup youtube link
SELFIE MIRROR SET UP & STRIKE
Backup youtube link
---------------------------------------------------------------
SELFIE MIRROR CHANGE PAPER/INK
(SAME PRINTER AND SET UP AS SUPERBOOTH)
Backup youtube link
---------------------------------------------------------------
SNAPSHOT PHOTO BOOTH SET UP
Backup youtube link
---------------------------------------------------------------
---------------------------------------------------------------
SNAPSHOT PHOTO BOOTH
CHANGE PAPER & REMOVE PRINT ERROR
Backup youtube link
---------------------------------------------------------------
SNAPSHOT PHOTO BOOTH STRIKE
Backup youtube link
---------------------------------------------------------------
SNAPSHOT PHOTO BOOTH
CHANGING PAPER / INK
CLICK HERE
---------------------------------------------------------------
Superbooth Photo Booth Set Up & Strike
How to Set up the Superbooth and turn it off correctly
Backup youtube link
Read the info below AFTER you watch the set up Video for the Super booth.
Do not touch the window or camera lens with your fingers or you will need to get a cloth and clean your finger prints off. If photo booth pics are blurry adjust the cameras focus as shown in the video above or check both sides of the photo booth window (and camera lens) and make sure they are clean. If you have to clean the camera,
only use a microfiber cloth to clean the camera lens.
It is also imortant to mark a spot on the floor where guests should stand for their photos. If you don't tell the guests they will stand too far (or too close) to the camera and the pictures will be blurry since this photo booth has a manual focus. (not automatic)
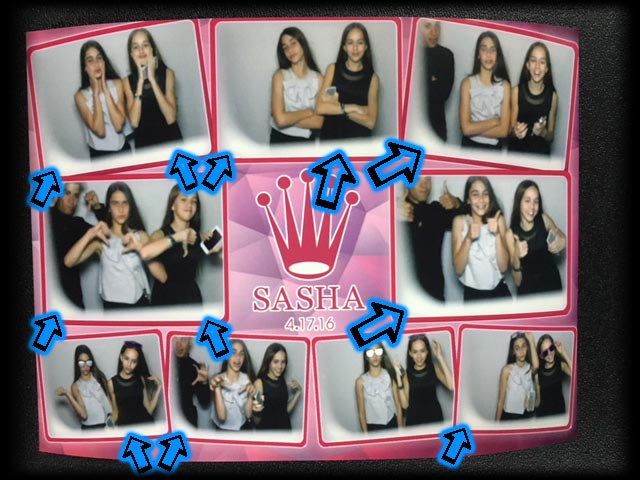
Look at the picture below. Look at all the blue arrows. If you see these white images in the corner of all the photos it means the camera itself is not aimed straight thru the window of the photo booth. The white images are the edges of the photo booth window. To fix this just straighten the camera so it is aimed straight throught the photo booth window.
The video gives a brief description for changing the menu options. To access the menu settings just take the keyboard out and turn it on and hold down the "Z" button. Do not let go of the "Z" button until you are finished making changes and saving them.
Use the up/down arrows to scroll thru the menus and press the "space bar" to select options you want to adjust. After you finish making changes scroll back to the main menu and scroll down to "Save Settings" and select it with the space bar. After you do this you will see a message say "save success", once you see this you can release the "Z" button and you are done. CAUTION: Directly above the Save Settings" option is another option called "Reset to Default Settings", NEVER PUSH THIS OR THE BOOTH WILL NOT WORK!
---------------------------------------------------------------
Superbooth Photo Booth
Changing paper/ Ink
How to change the paper for the DNP RX1 printer (Instacam & Selfie Photo Booth also)
Always change BOTH the ink ribbon and the paper at the same time!
Backup youtube link
---------------------------------------------------------------
WHITEBOX PHOTO BOOTH
Backup youtube link
---------------------------------------------------------------
---------------------------------------------------------------
---------------------------------------------------------------
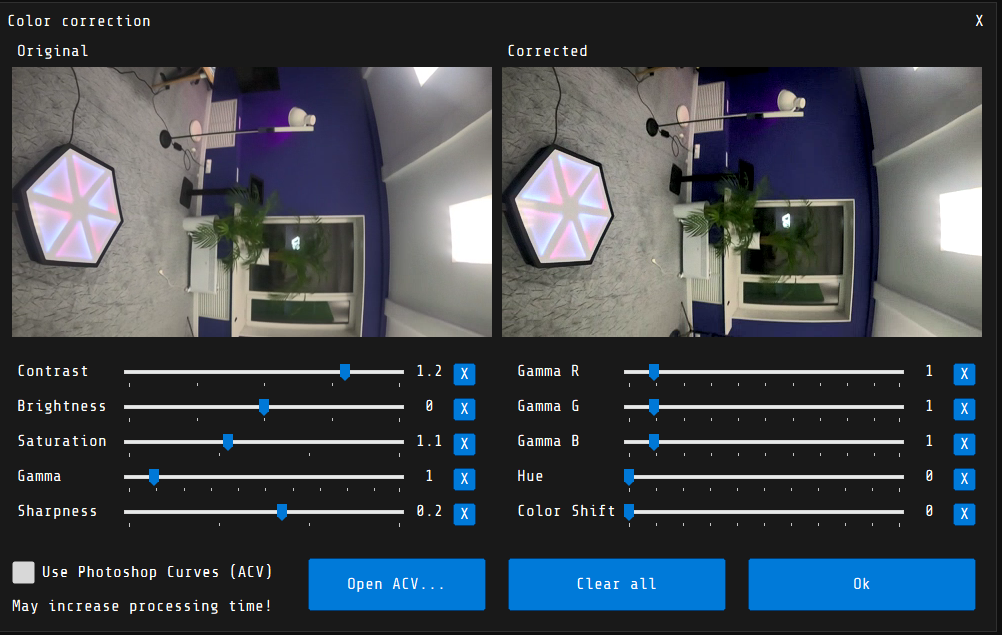
CAMERA TERMINOLOGY AND RECOMMENDED SETTINGS
We'll cover the terminology and meaning of various camera settings, and go over recommended settings.
I used screenshots from Photo Booth Upload software (PBU), but these settings can be applied to any photo booth program. Below are the settings for DSLR Live View/Burst, Photo, and Video.
The images show the recommended settings
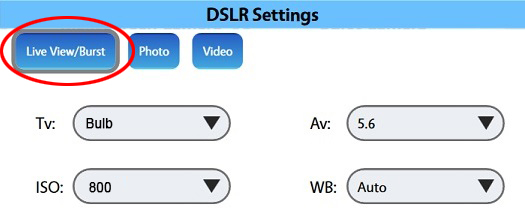
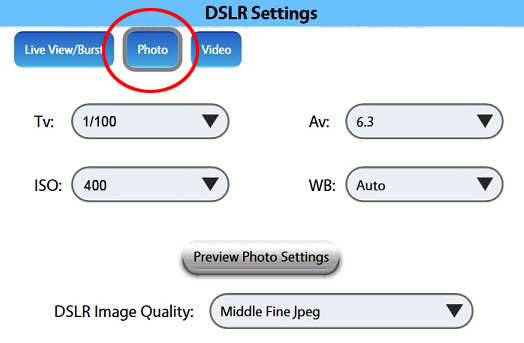

And here is a break down into the effects and changes of Av, Tv, and ISO settings:
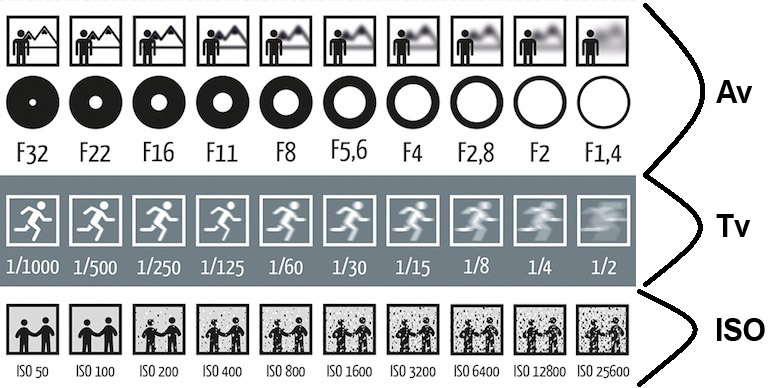
Av (Aperture/F-Stop):
Lower setting makes image brighter, but only subject will be in focus
Higher setting
makes image darker, but everything (subject and background) will be in focus
The Av setting adjusts the size of the hole through which light enters the camera body and strikes the sensor. As depicted in the image above, the higher the Av number, the smaller the hole in the lens will be. Not only does Av adjust the amount of light that is able to enter the camera, it will also cause changes in depth of field. The larger the Av value, the more everything in view of the lens will appear in focus between your subject and background. The smaller the Av value, the more depth and focus changes will be visible between your subject and background (or foreground). Essentially, a lower Av value will blur the background and make your images look more professional, but there is a risk that groups of people may be partially out of focus if some are closer or farther away from the camera.
The settings for Av should be changed based on lighting, environment/space, and desired effect. In most instances, we find that adjusting the setting somewhere between 5.6 and 8 will give us a nice image. Higher Av values should only be used in brighter environments like direct sunlight.
Tv (Shutter Speed/Exposure time):
Lower setting makes image blurry, but brighter
High setting makes image sharper, but darker
The Tv setting adjusts the amount of time the camera shutter is open. It is usually measured in fractions of a second, e.g. 1/30 is one thirtieth of a second. The lower the value (1/60 is lower than 1/30), the more frozen the image will appear. The higher the value, the more motion blur will be captured.
These settings will change based on lighting, environment/space and desired effect. In most instances, we find that keeping Live View/Burst on Bulb and Photo between 1/100 and 1/60 gives us a great look. If you are in bright light, try 1/250.
If you're shooting video you should set Video to 1/30 or 1/60 or 1/125 (depending on the video frame rate set in the camera). If you don't, your video setting will switch to 1/30 or 1/60 or 1/125 when you start recording, which could make your videos darker if the Tv value was set to something like Bulb.
ISO (International Standards Organization):
The lower the value, the less sensitive the sensor will be to light. ISO is a great way to quickly brighten or darken the image. However, the higher the value, the more "noise" will appear in your image. You should never go over 1600 ISO for photos unless you have a very good reason.
We generally find setting Live View/Burst and Video to 800 and Photo to 400 works well.
White Balance (WB):
This is the process of adjusting color so that objects which appear white in person are rendered white in your photo. White balance takes into account the "color temperature" of light. Tungsten, for example, should be used when the subject is under incandescent light. It will take some testing to find the best White Balance for your scenario, but we often find Auto or Cloudy work well for us.
Image Quality:
This adjusts the original image quality and size for photos. Middle Fine Jpeg is usually the best option for most photos. Switching to Small is only necessary if you're worried about hard drive space.
DSLR Movie Setting:
Lets you choose the pixel dimensions and frame rate of the recorded video. 1280x720 59.94 fpsand 1920x1080 29.97 fps are the most used options, but you may see 1280x729 119.9 fps if you're using a camera like the M50 and have it set to HFR mode.
Suggested Video Settings
The settings below are optimal for most videos and generally give us excellent results. These values assume you are using a constant light in a controlled lighting environment. Processing time will be greatly affected by changing your video settings.
Plain or Green Screen Video:
DSLR Movie Setting: 1280x720 @ 59.94 fps or 1920x1080 @ 29.97 fps
Tv: 1/60
Av: 5.6
ISO: 400
WB: Cloudy or Auto
Slow Motion:
Point Gray Flea 3 Camera Settings: 960x720 @ 120 FPS
DSLR Movie Setting: 1280x720 @ 59.94 fps for normal DSLRs or 1280x720 @ 119.9 fps when using the M50.
Video tab settings:

To maximize compatibility, all videos will be re-encoded to MP4 when shared.
Light Painting Settings:
The room you're light painting in should be completely dark. In most circumstances the following settings will work for your light painting event; however, there may be certain variables that require you to adjust these settings slightly in order to get the desired results.
DSLR Settings
Tv: Bulb
Av: Start at 8
ISO: 200
Click the link below for more camera adjustments for brightness, sharpness, focus, quality, and more.
CLICK HERE
For more information call 1-954-612-7431 or