![]()
Employee Training Guide
Cant watch videos? CLICK HERE for quicktime plugin

CAMERA ADJUSTMENTS & SETTINGS
2. ZOOM LENS TO 24MM
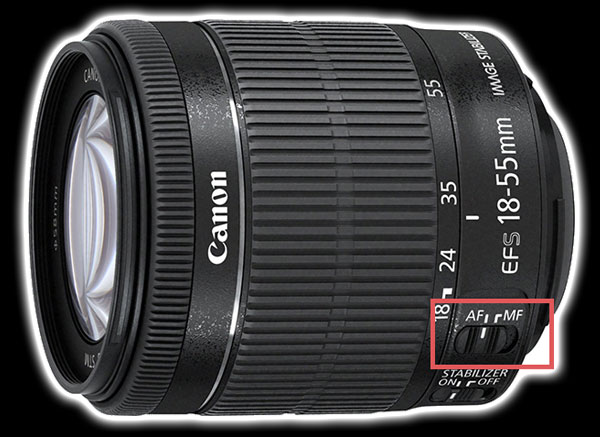
3. LENS TO AF AND STABILIZER OFF
4. TURN CAMERA ON (NOT VIDEO)
SHUTTER SPEED: 1/200s
APERTURE: 9.0 - 11.0
ISO: 400
IMAGE QUALITY: S2
WHITE BALANCE: SHADE
PICTURE STYLE: NEUTRAL
AUTO POWER OFF: DISABLE
----------------
ERRORS IF SETTINGS ARE NOT CORRECT (Assuming you are on Manual Mode)
SHUTTER SPEED
Shutter speed too low: The image will appear too bright if the shutter speed is low. Ambient lighting will also show. Blurring will appear around subjects.
Shutter speed too high: There will be a black bar across the image or it will be completely black. This is because the maximum sync speed is 1/200s. Anything faster and the shutter will cut off the image while it's flashing, hence the black bar.
Shutter on BULB: The camera will begin to take the picture, but never finish. You'll hear only one click instead of the two clicks that the camera makes. This will freeze the computer.
APERTURE
Aperture too high: The image will appear too dark
Aperture too low: The image will appear too bright
ISO
ISO too high: The image will appear too dark
ISO too low: The image will appear too bright
IMAGE QUALITY
Image quality set too high: Social booth will take much longer to load
Image quality set too low: Images will be too low resolution to print
Image quality set to RAW: Social booth does not support RAW shooting
WHITE BALANCE
White balance set to anything else: The overall color of the image will differ
PICTURE STYLE
Picture style set to anything else: The prints will appear over or understated in color.
AUTO POWER OFF
If not set to auto power off, then the program will freeze because the camera disconnects.
How far should the Backdrop be from the Photobooth?
5'-6' away. You can set it further back than that, but that will cause the light to be further away from the subject and therefore creating a darker image. You can adjust this by setting Av: to 8.0 or lower and/or increasing the ISO to 800 or 1600. Increasing the ISO will cause a loss of quality in your images. I don't suggest going higher than 800 if you're using the Canon T3i.
My Settings are Right, but my Photos are Dark
1) Make sure your booth is only 5'-6' away from the backdrop. The closer the light is the stronger it will hit your subjects. We like to set the camera lens zoom at 24MM but it can be wider or narrower depending on how many people you want to fit in your frame.
2) Check and see if your strobe (light)is firing. The strobe needs to fire for the recommended settings to function. Make sure it is plugged in and working.
The Image is White or Overexposed
Make sure your guests are not standing too close to the photo booth.
The other solution is incorrect camera settings. Unplug the camera from the USB Hub and ensure that all of the settings are correct. The camera should be set to "ON" and not "Video." The camera should be programmed to the settings below. The "Av" or "Shutter Speed" is normally the cause of the error. The shutter speed will sometimes show as BULB or 25"/30" which means that the camera is exposing for an indefinite amount of time, 25 seconds, or 30 seconds, respectively. IMPORTANT: If you have to change any settings below make sure you take a picture with your phone of all the settings BEFORE you change them incase you need to change them back, and if you do change any settings send pics of all the original settings to Eric.
Camera Settings – Make sure the camera is set to Manual
Lens – 24MM – AF on (Autofocus) – IS off (Image Stabilization)
Distance – 72″ away from backdrop
Av: 9.0 – 11.0 (Depending on distance from backdrop, ceiling height, etc.)
Exp: M
ISO: 400
Size/Quality: Medium/fine or Small/fine
White Balance: Shade (You can play with this to see what kind of color you like, I prefer Shade)
Metering Mode: Evaluative
Drive Mode: Single Shot
Picture Style: Neutral
Tv/Shutter Speed: 1/200
Error: Freezing During Countdown
We have always found it better to use manual focus over auto focus. This is because most photo booth software will malfunction if the camera cannot lock focus. If this happens, the software will need to be restarted, along with the camera.
The simplest way to remedy this issue is to set the camera to manual focus. You can do this by switching the slider on the lens to the MF position, for manual focus. See Diagram 1
DIAGRAM 1
When setting up the photo booth you can focus the camera by turning the thin, outer focus ring on the lens (see Diagram 2). To ensure that the image is sharp, find an image with text or make a sign and place it where the guests will stand. On the back of the camera (see Diagram 3) press the "live view" button (button "C") to view the live image on the LCD display (see "G" in Diagram 3) and adjust the focus so you can read the words clearly that you placed in front of the photo booth. Once the focus is set, press the "live view" button again to deselect it.
DO NOT FORGET TO DESELECT "Live View".
DIAGRAM 2
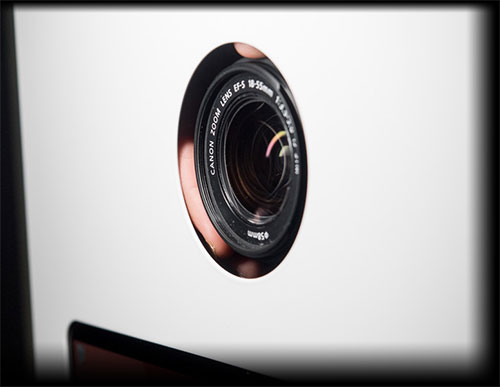
DIAGRAM 3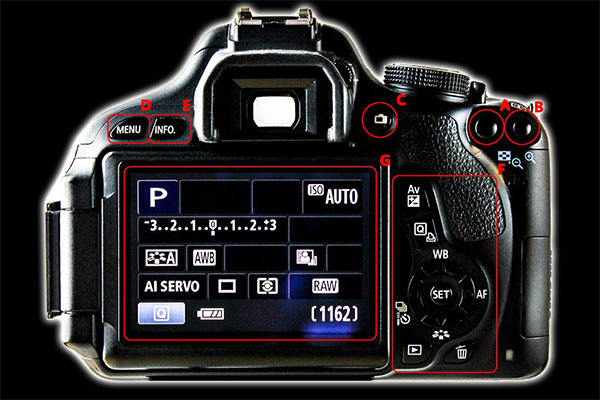
Another solution is to aim the camera where the guests will stand and press the shutter button down halfway while the lens is in AF to lock focus. Once locked, switch the camera back to MF (Diagram 1) and you are all set.
If you encounter a program error it's very easy to get back up and running. Restart the computer and photo booth program. If you cannot get the photo booth program to quit then access the task manager to exit out of the program by hitting CTRL + SHIFT + ESC on the keyboard. Look for the name of the program that wont quit and press "End Task". Restart the computer and then restart the Photo Booth software.
How Much Power Does The Booth Need?
DNP DS40 / DNP DS620A - 400W - 1.6-3.9AMPS
Alien Bee Strobe - 150W - 6AMPS
Camera - 15W - 2AMPS
Tablet - 24W - 1.6AMPS
All of them run from 100-240V and 50-60Hz.
We recommend a 1500W or 2000W generator. (for outdoor events)
If you are in need of amps or volts use the following conversion information:
The conversion of Watts to Amps at fixed voltage is governed by the equation Amps = Watts/Volts. For example 12 watts/12 volts = 1 amp
The conversion of Watts to Volts at fixed amperage is governed by the equation Volts = Watts/Amps. For example 100 watts/10 amps = 10 volts
For more information call 1-954-612-7431 or ![]()
![]()